Voicer WordPress Theme
Premium WordPress Theme
- Updated: October 2024
- By: Softali - Envato author Profile
- Current theme version 1.4.5
Thank you for purchasing our theme. If you have any questions that are beyond the scope of this help file, please feel free to email us via our support forum Support. Thank you very much!
Lets take a closer look at the theme's structure
Installation
Before beginning the installation and configuring of your new theme, you must first have WordPress already installed on a server.
If you are struggling, here is a very detailed guide at Wordpress Codex that will walk you through every step.
Installing The Theme
Once you have setup a copy of WordPress, there are two ways you can go about installing the theme:
FTP Upload
Unzip the downloaded package and upload the theme directory /voicer/ into your WordPress themes directory /wp-content/themes/.
WordPress Automatic Installation
This is definitely the easier route for most. Simply navigate to Appearance > Themes > Add New > Upload Theme. Click the 'browse' button and locate the still zipped theme folder. The theme will be uploaded and installed in a matter of seconds.
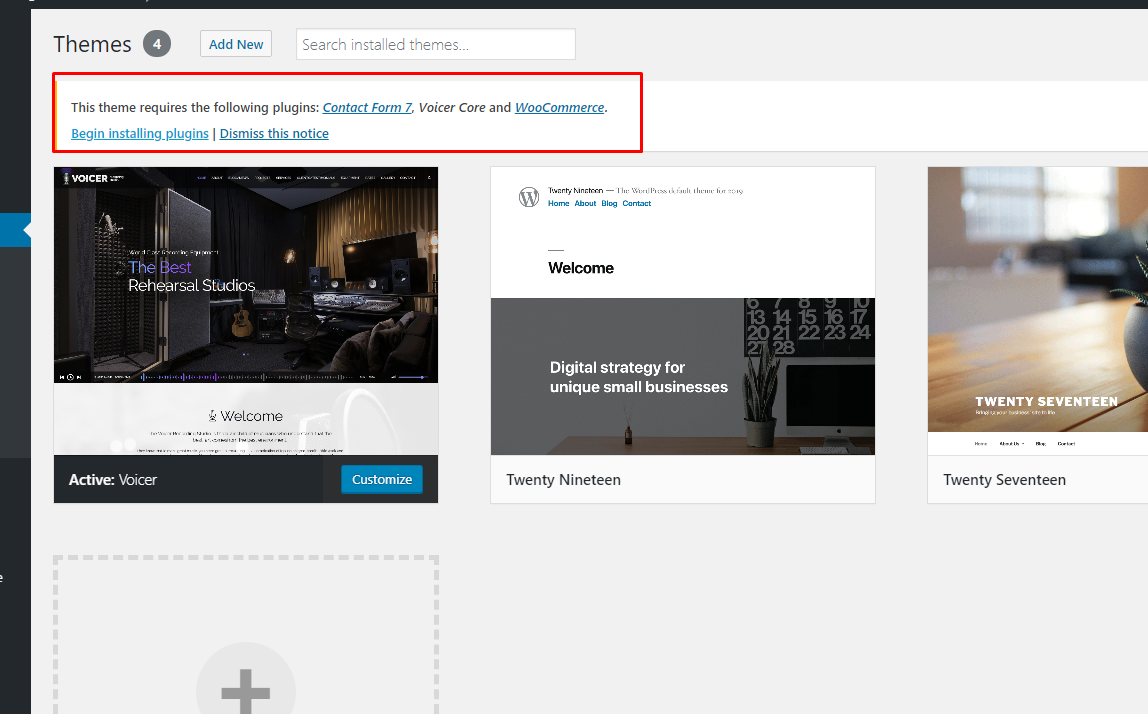
Then you need to activate installed theme.
Click Activate or go in admin left menu: Appearance -> Themes and activate Voicer

-
Once you have installed and activated our theme you will be promted to install theme's plugins. Activation of them will be done automatically.
-
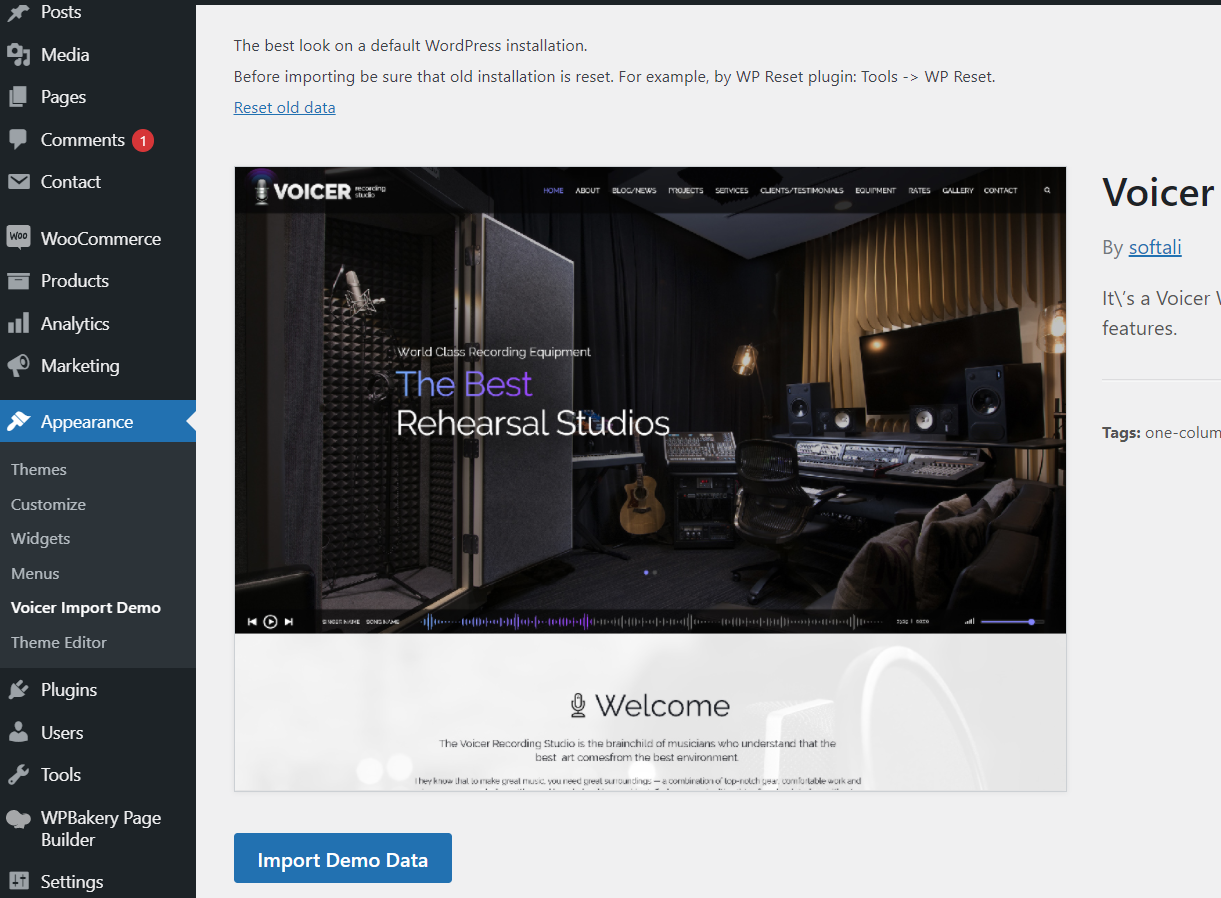
Import Layout
Import layout. Go in Appearance -> Voicer Import Demo. Import any layout
-
NOTE! If you need to have the original theme's layout reset all data by using WP Reset plugin. Go in Tools -> WP Reset

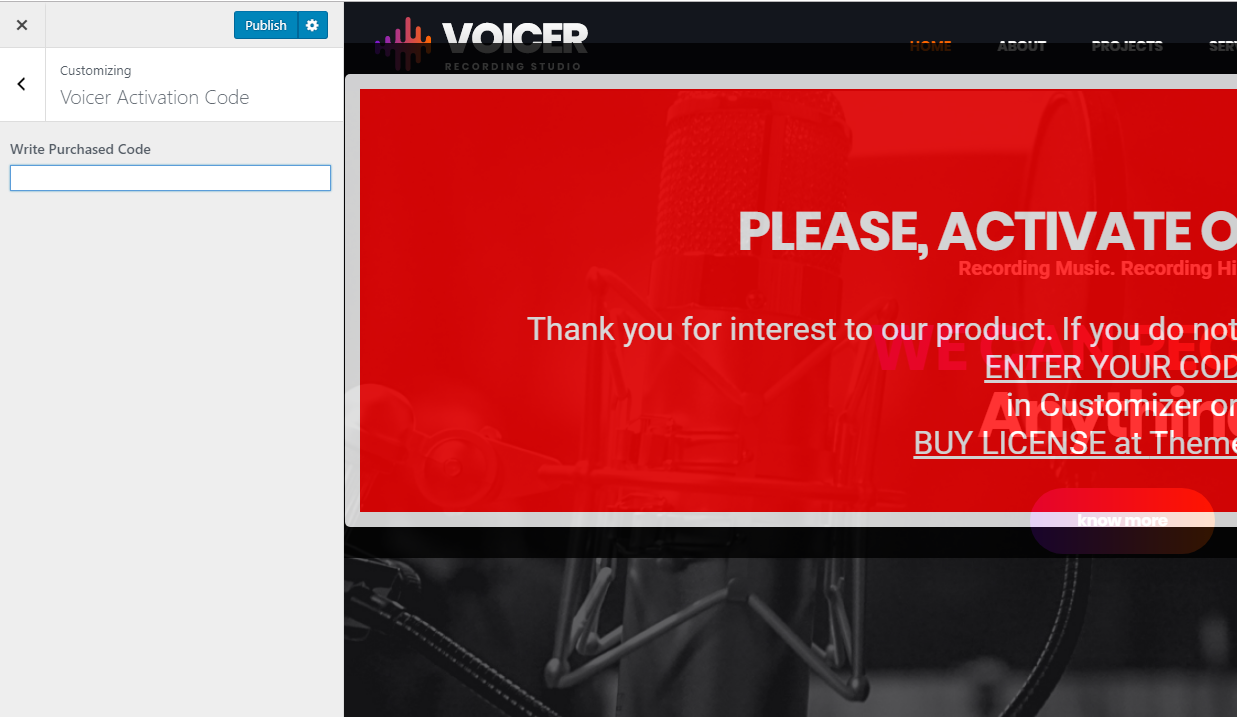
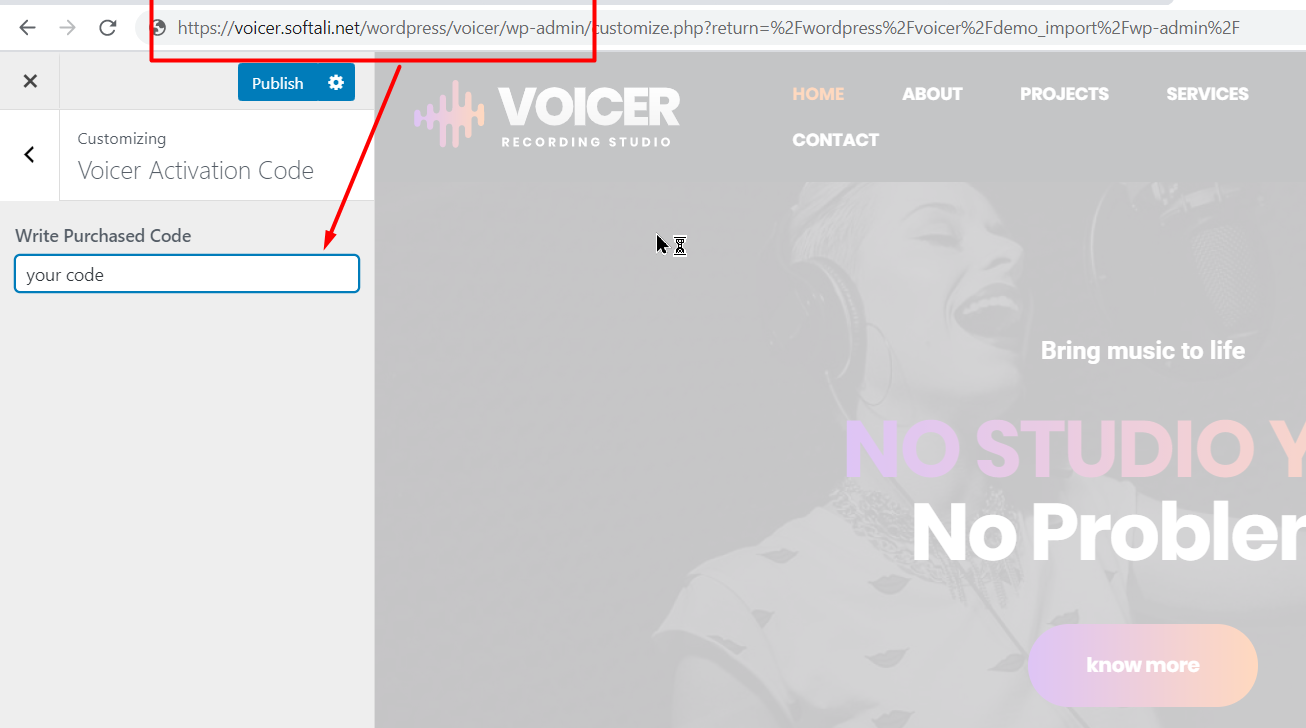
Activation
Please, keep in mind that one license of our theme can be used on one domain only.
If you need to move your license from one domain to another you should remove the license code from the old domain: remove the license in the Customizer, press the save button.
After this please write to us. We'll reset it.
Don't activate any of caching plugins till your theme's version is activated!
Activation process
Go in admin menu: Appearance -> Customize -> Voicer Activation Code
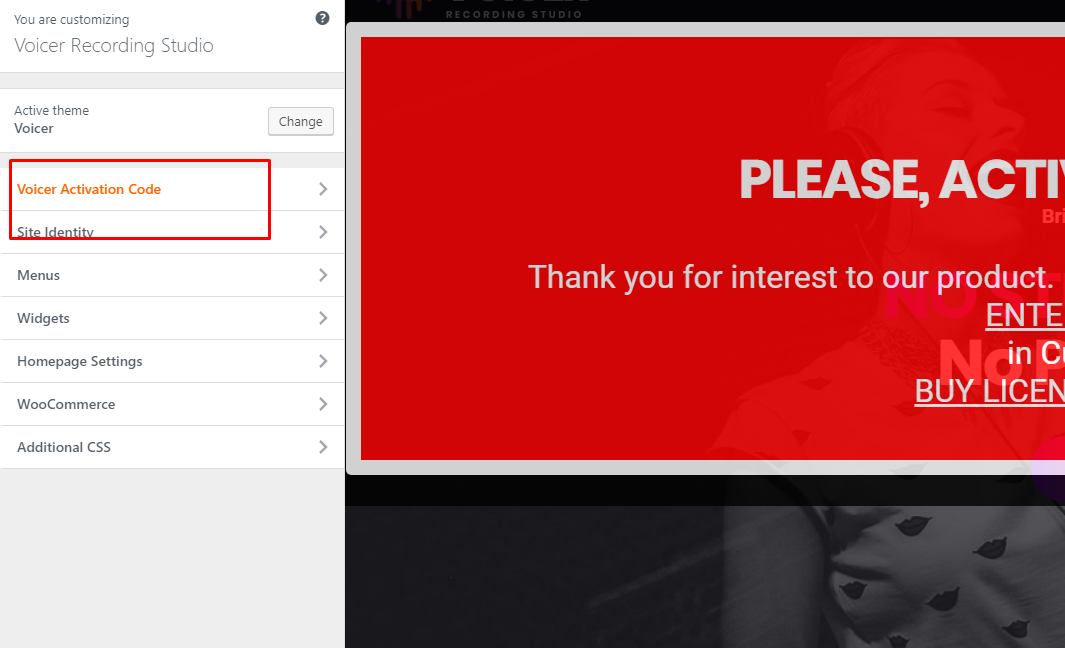
Enter your purchased code and press the Publish button
Activation Problems
Please, keep attention if you see any problems with activation they can be caused by some reasons which are not connected with theme's files:
-
One license on two sites
You've entered your license code in one site or even on local hosting, for example, for development process. Then you're trying to enter the same code in the other site which will be your final site.
In such case you should remove the code from your development site, press the save button in the Customizer. Later you should write us on the forum to reset your code from the old site
-
Old theme's version
Please always check do you have the latest version of our theme.
During development process we make a review of theme's code, fix the issues and speed up activation process to ensure it on slow or non-optimised servers
After theme's update clean full browser cache or see your site in the incognito browser tab. Or check your site in an other computer/mobile device
-
Mess of domain names
Activation works for the current domain (domain name).
Pay attention if your site and admin panel have different addresses - this can cause problems with activation.
-
Using of caching plugins before license code entering
Firstly be sure that activation is done. Than activate a cache plugin.
Update
Backup all your themes files and database before any changes making
-
Upload all files from our theme's folder to the theme's folder on your server
This loading of files doesn't change your existing pages/posts/media files
This loading of files doesn't effect on Custom css which can be written on your site in Appearance -> Customize
-
If you haven't used Child theme and made changed directly in our theme's files you have to notice all of them.
After uploading of files from our latest version you will have to add your changes again
To detect and keep all your changes, compare them with a new code you can use any versions control software as GitHub or some svg systems.
So, you will check all actions in theme's package
-
The other step is to update the plugin Voicer Core
Don't reinstall it (don't make deactivation and activation of the plugin)
-
The latest version of the Voicer Core plugin is located in the theme's folder: \voicer\inc\libs\tgm-plugin-activation\plugins\theme-core.zip
Copy this package to your computer and unzip it
-
You will get the folder [theme-core] on your computer
Upload all files from the folder to the folder of the Voicer Core plugin on your server
This path is /wp-content/plugins/theme-core/
-
Refresh a full browser cache by pressing twice Ctrl + F5
Or check your site in some new browser/mobile device
-
Update of WPBakery composer
Don't reinstall it (don't make deactivation and activation of the plugin)
Unfortunately, you're unable to update the plugin in the admin.
The latest version of it you can always find in our theme’s package: Voicer_Package/Plugins/wpbakerybuilder.zip
Or we can attach the package directly via our support forumJust unpack this package on your computer and upload all file by ftp from it on your site: /wp-content/plugins/js_composer/
Wait till all files from the plugin are uploaded. Don’t touch anything while it is uploading.
HEADER: Blocks in Header
-
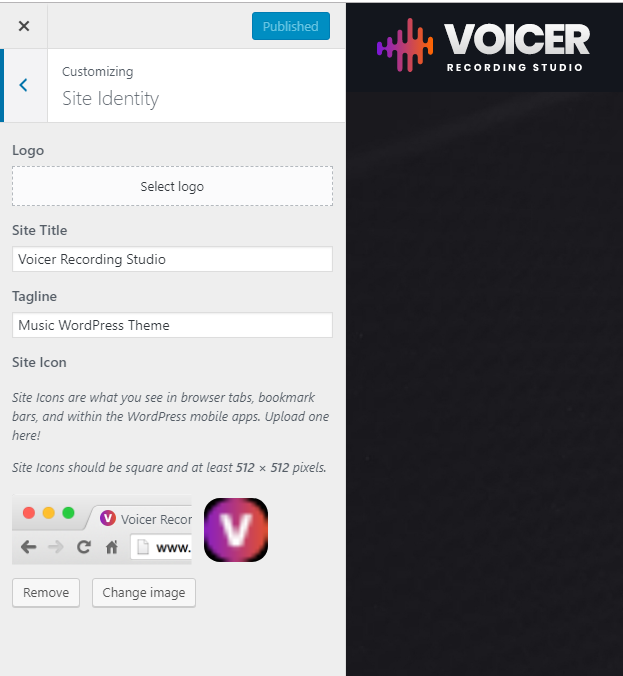
Logo, Favicon - go in admin left menu: Appearance -> Customise -> Site Edentity -> Logo / Site Icon
-
Top Menu - go in admin left menu: Appearance -> Menus -> choose Voicer Header Menu (Voicer Header Menu) and edit it following the standard WordPress procedure.
-
Header Top Cart - go in admin left menu: Appearance -> Widgets -> Theme Header Cart, add/remove shotrcode:
[theme_mini_cart]
FOOTER: Blocks in Footer
-
Footer menu
Arrange menu in admin left menu: Appearance -> Menus -> Theme Footer Menu
Choose corresponding menu and add/edit items -
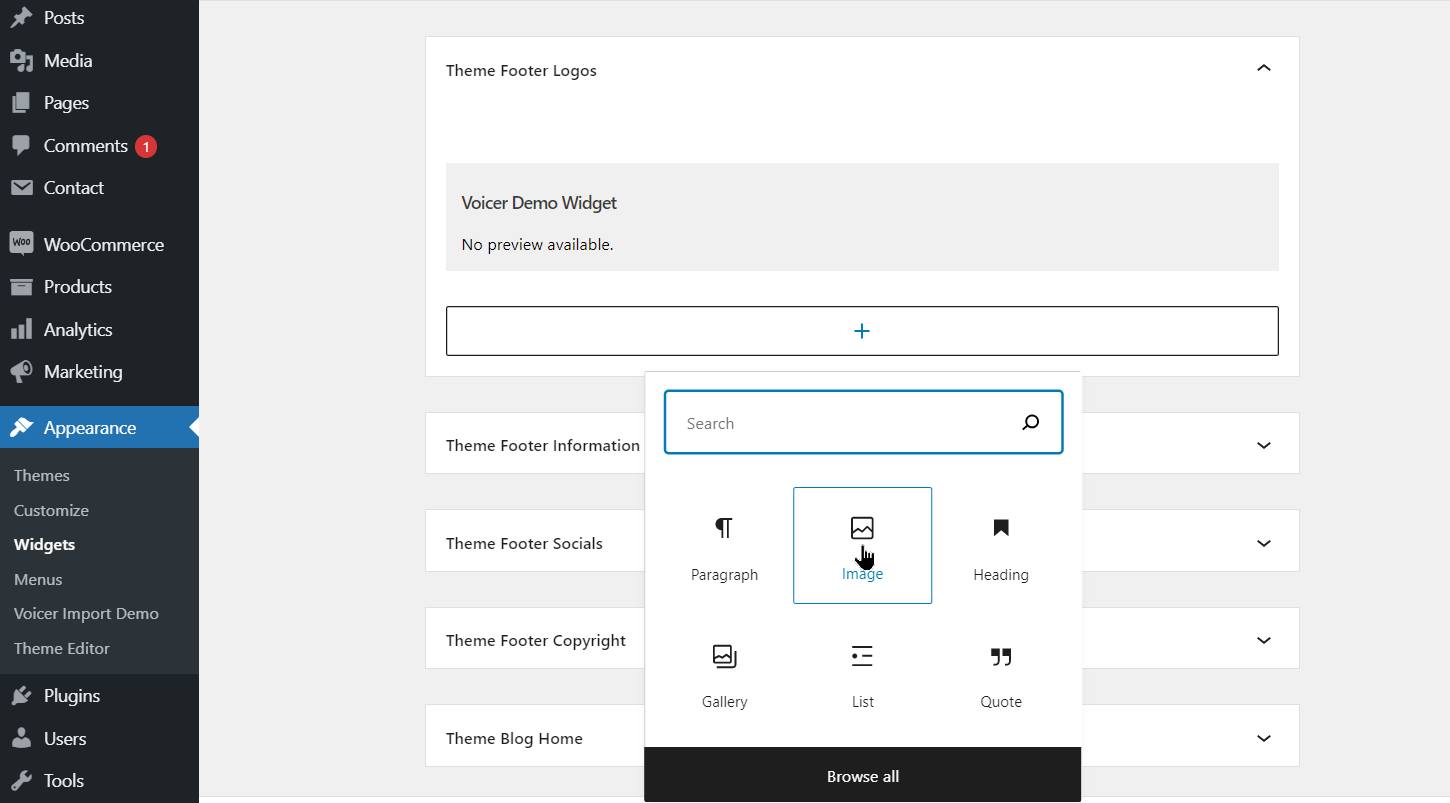
Footer Logo
Go in admin left menu: Appearance -> Widgets -> Theme Footer Left Logos
By default svg icon logo is set. You can remove full the code and insert own svg code for logo or remove existing widget and add Image widget with own logo.
-
Footer Information
Go in admin left menu: Appearance -> Widgets -> Theme Footer Information
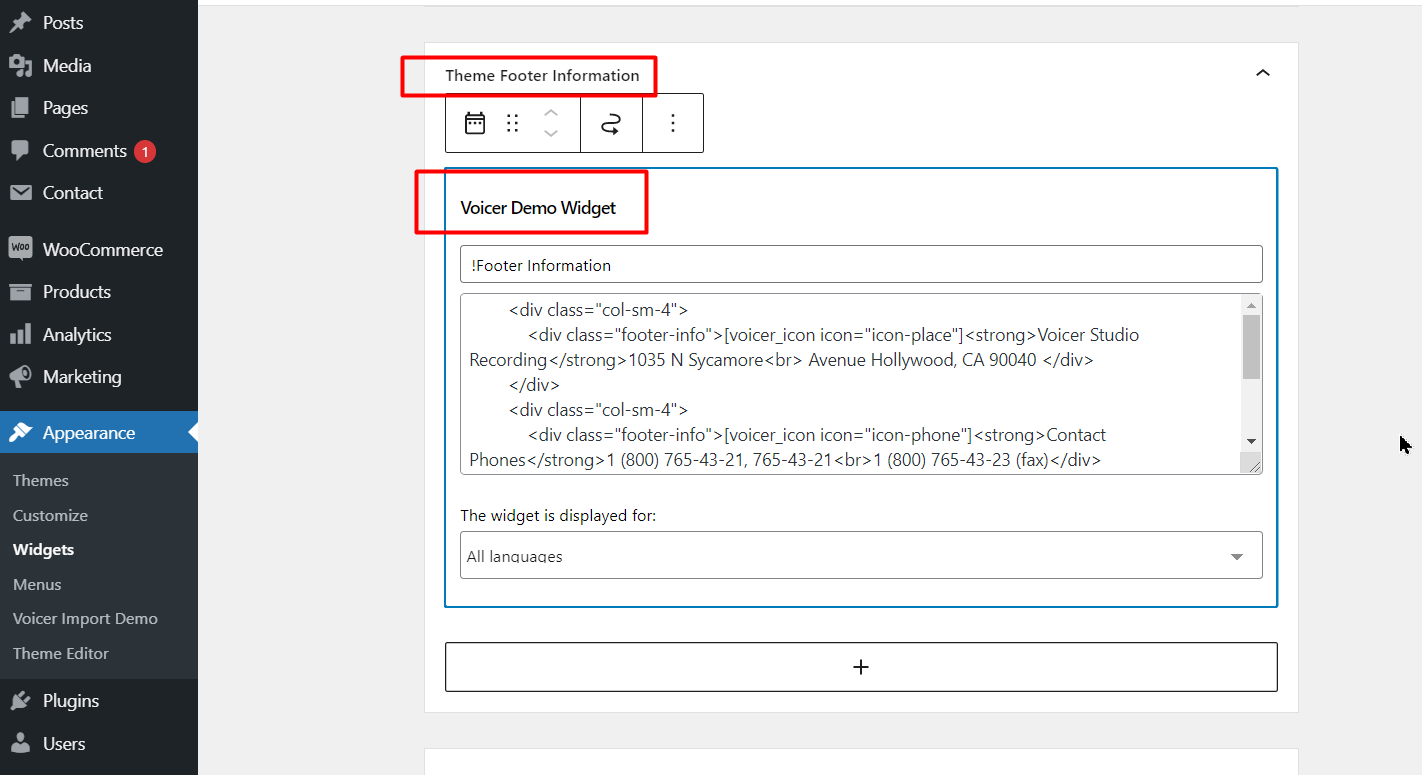
Default html content from the demo:
-
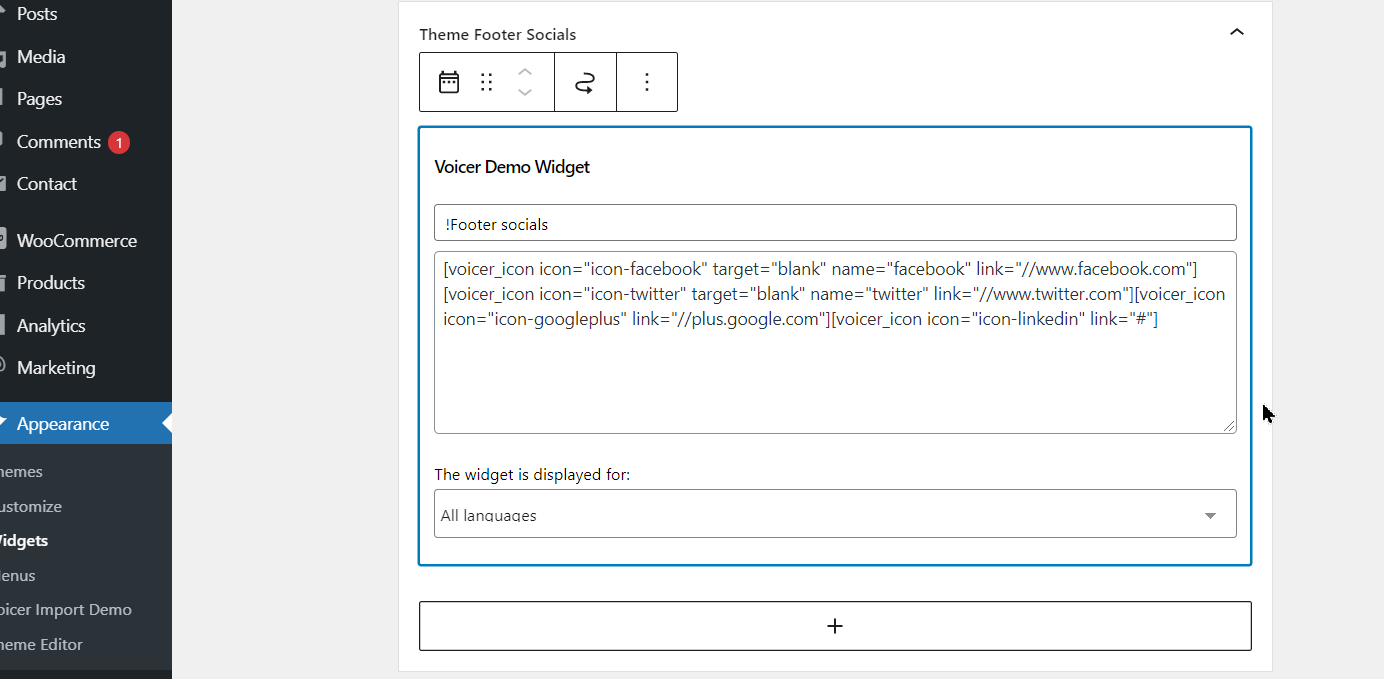
Footer Socials
Go in admin left menu: Appearance -> Widgets -> Theme Footer Socials
-
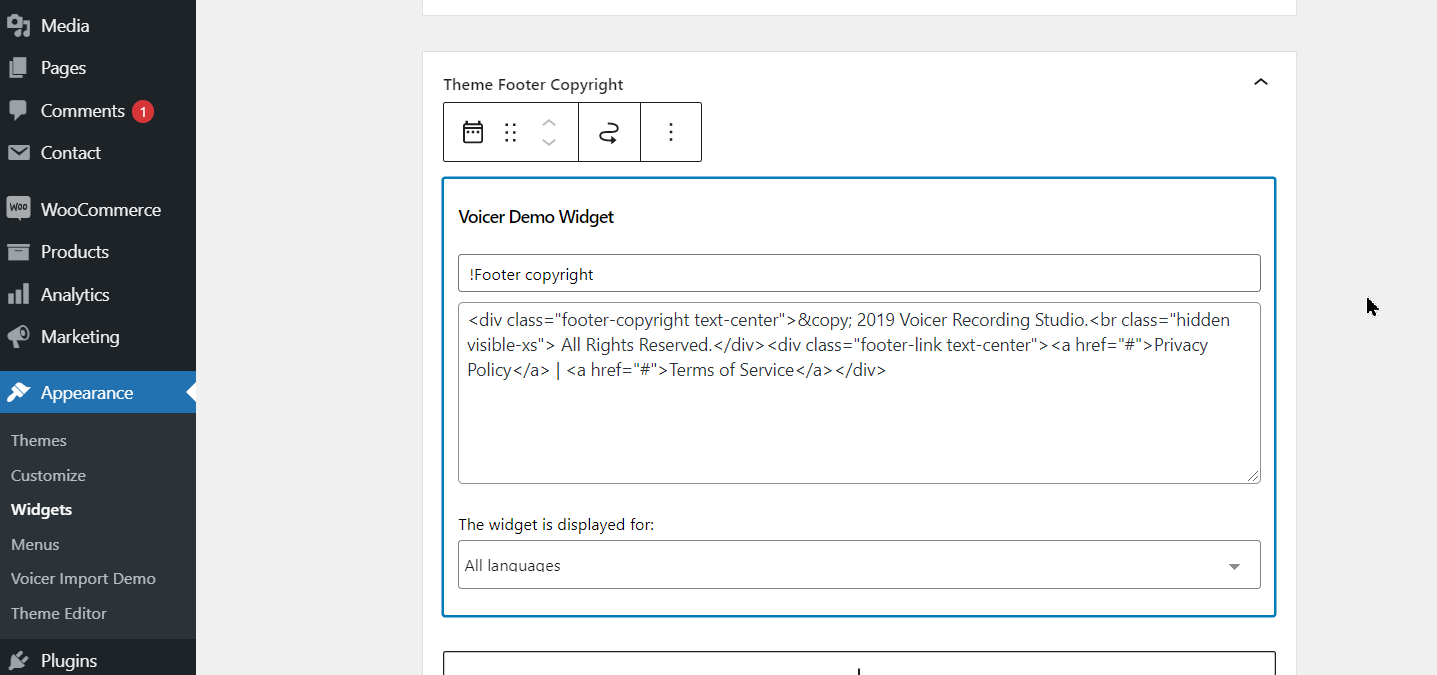
Footer Copyright
Go in admin left menu: Appearance -> Widgets -> Theme Footer Copyright
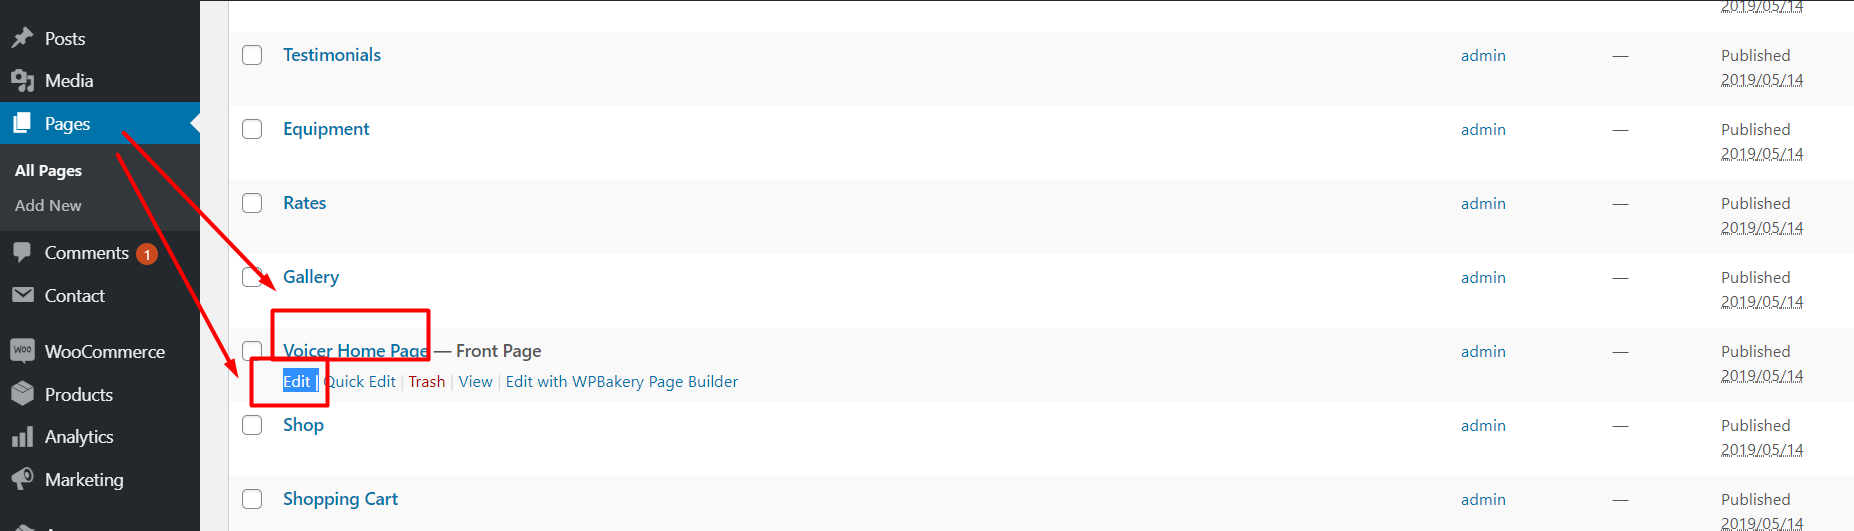
Homepage
Go in Pages -> Voicer Home Page
Homepage demo html
Advanced Main Slider
To edit/add the Advanced Slider: Images, Texts, Videos go in the admin: Pages
Press Backend editor (if it wasn't pressed before)
Add WP Bakery composer element: Voicer Advanced Slider
Keep attention to parameters which can be used in the Content for all Slides field.
-
{slide}
This term divides Main slider to separate slides
If you have only one slide you don't have to write this term
-
Only one of this terms should be used in one Slide
{image} - if you need to add an Image write this term and add images in the field Images of element
{video} - for video code, for example, in *.mp4 format. Write video code after the term
{youtube} - for YouTube embedded code. Write a code after this term
{vimeo} - for vimeo videos. Write a code after this term
-
{text}
Write each time this term even if there are no texts in a slide
Examples of composing of Advanced slider:
-
Slider with 3 slides:
1 slide with image without text
2 slide with image and with text
3 slide with image without text{image}{text}
{slide}{image}{text}<h4>text</h4>
{slide}{image}{text}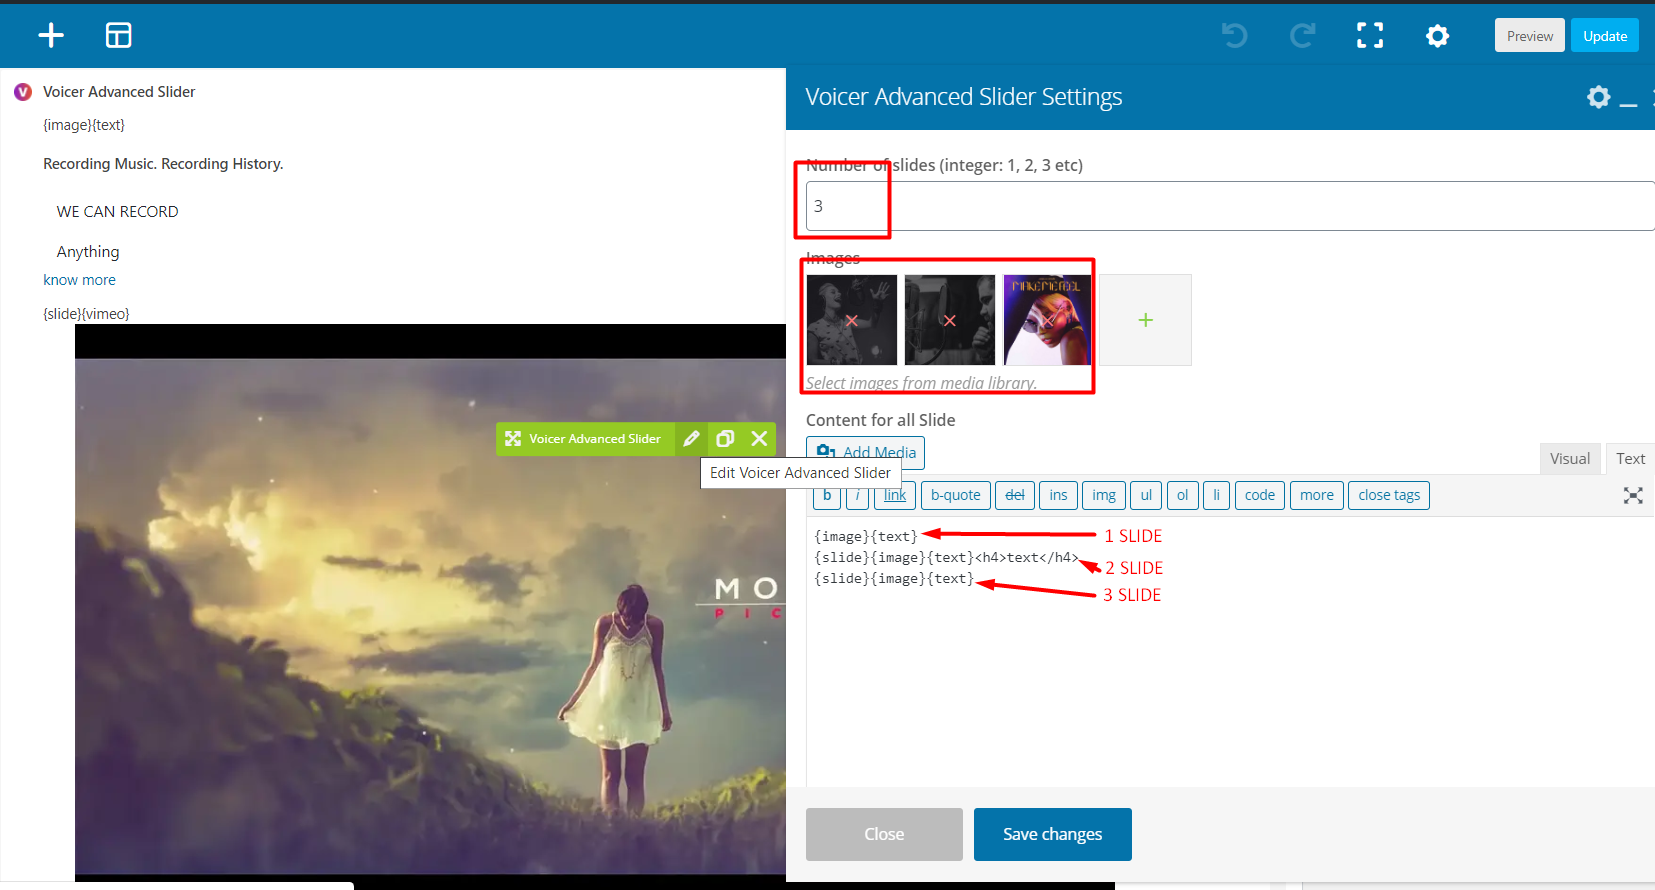
-
Slider with 2 slides:
1 slide with image and text
2 slide with vimeo video{image}{text}
{slide}
{vimeo}<iframe class="embed-player slide-media" src="https://player.vimeo.com/video/217885864?api=1&byline=0&portrait=0&title=0&background=1&mute=1&loop=1&autoplay=0&id=217885864" width="980" height="520" frameborder="0" allowfullscreen="allowfullscreen"></iframe>
{text}
-
We recommend using the following plugin: Social Feed Gallery.
However, you are free to explore and use other compatible plugins if preferred.
-
To use this plugin, you must have an active Instagram account and be logged into it.
-
After installing the plugin, simply follow the provided setup instructions.
-
Alternatively, you may use plain HTML for integrating the Instagram HTML section.
You can copy the HTML code from this file, item 11.
Blog Posts
Go in Pages, activate Backend Editor (if it isn't enabled before), press Add Element Theme Elements -> Theme Posts Slider, press Edit.
By default block is stretched to full width and has 3 slides
If you need to change visible number of posts in carousel and their width pay attention to parameters in it:
-
Number of posts to show
Go to the tab: Slider Options -> Slides to show - visible number of blog posts in carousel
If you need, for example, set 4 visible slides you should write the 4 here
-
Width of one single post in carousel
Go to the tab: General -> Blog post grid class name
By default the number of visible posts is 3. So, css is written for 3 grids. Full number of grids is 12.
So, we have css: column col-sm-4 news-item that is 12/3 = 4
If you need, for example, set 4 visible slides you should write the css as column col-sm-3 news-item
-
Full number of posts in carousel
General -> Common Count of Posts - full number of posts which will be added to Posts carousel
-
General ->All block outer class name
To see full width carousel you should add css: row news-slider ini-news-slider-mobile tt-block-news
Keep attention to all css classes here
Pages
All Pages
-
Pages Title block
-
To disable pages Title block in some page open in admin the desired page
In Pages Attributes check that Template is set as Voicer Template
In the bottom part Page Format Options enable the option Not display title from admin field "Title"
-
To change background image/background color of the title block go in Appearance -> Customise -> Theme colors -> Colors (content)
-
-
General recommendation about working with pages
-
All pages are composed by using of WPBakery visual composer. You can open each element, change texts, images, backgrounds in it.
-
To edit some page go in admin: Pages.
Press on a page title or press the Edit button
We don't recommend to press the buttonEdit with WPBakery Page Builder. It works only when you create a page from the scratch fully by the Composer elements and no using of theme's developed elements and theme's css/html arrangement.
There is an additional functionality is added to the Composer which works correctly on storefront. But it is not recognized by the Composer's admin decoration. -
To work in easy visual mode with WPBakery Composer you should enable it by pressing Backend Editor button (if it wasn't enabled before).
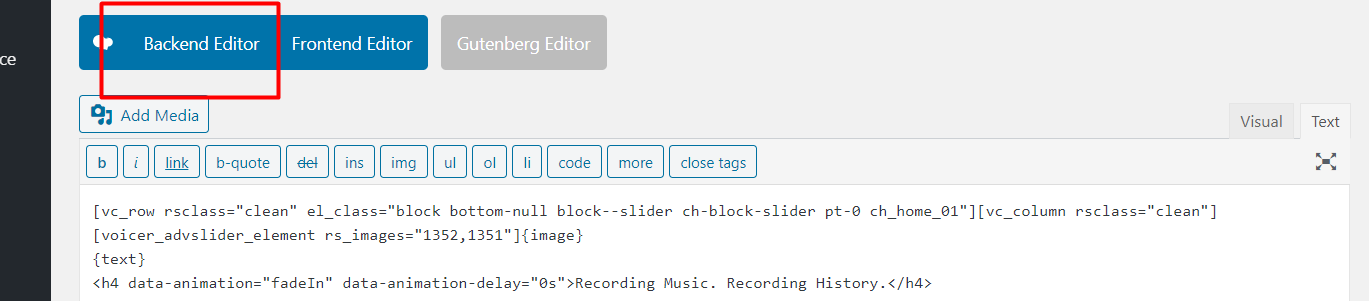
If you see Classic Mode button it means that Editor is activated
-
If Editor is activated you're able move blocks by their positioning
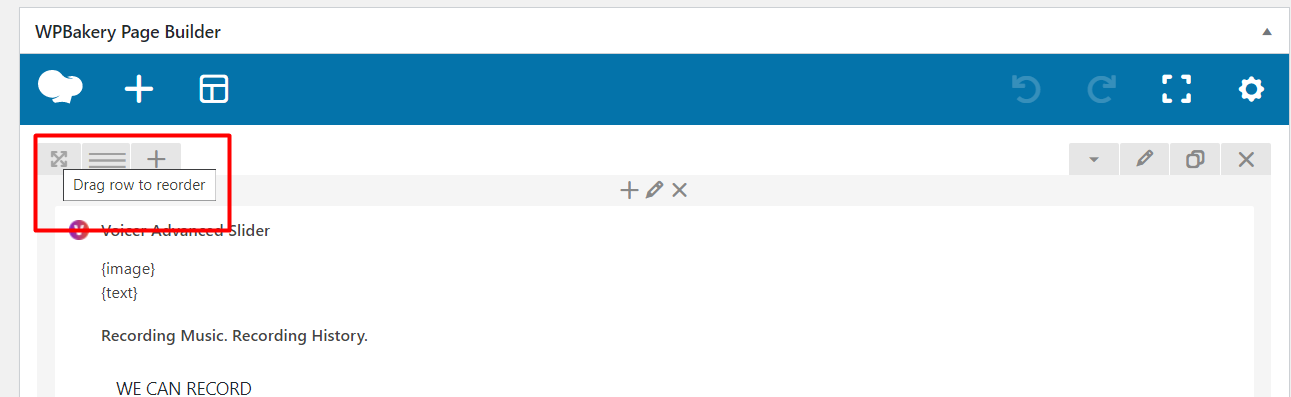
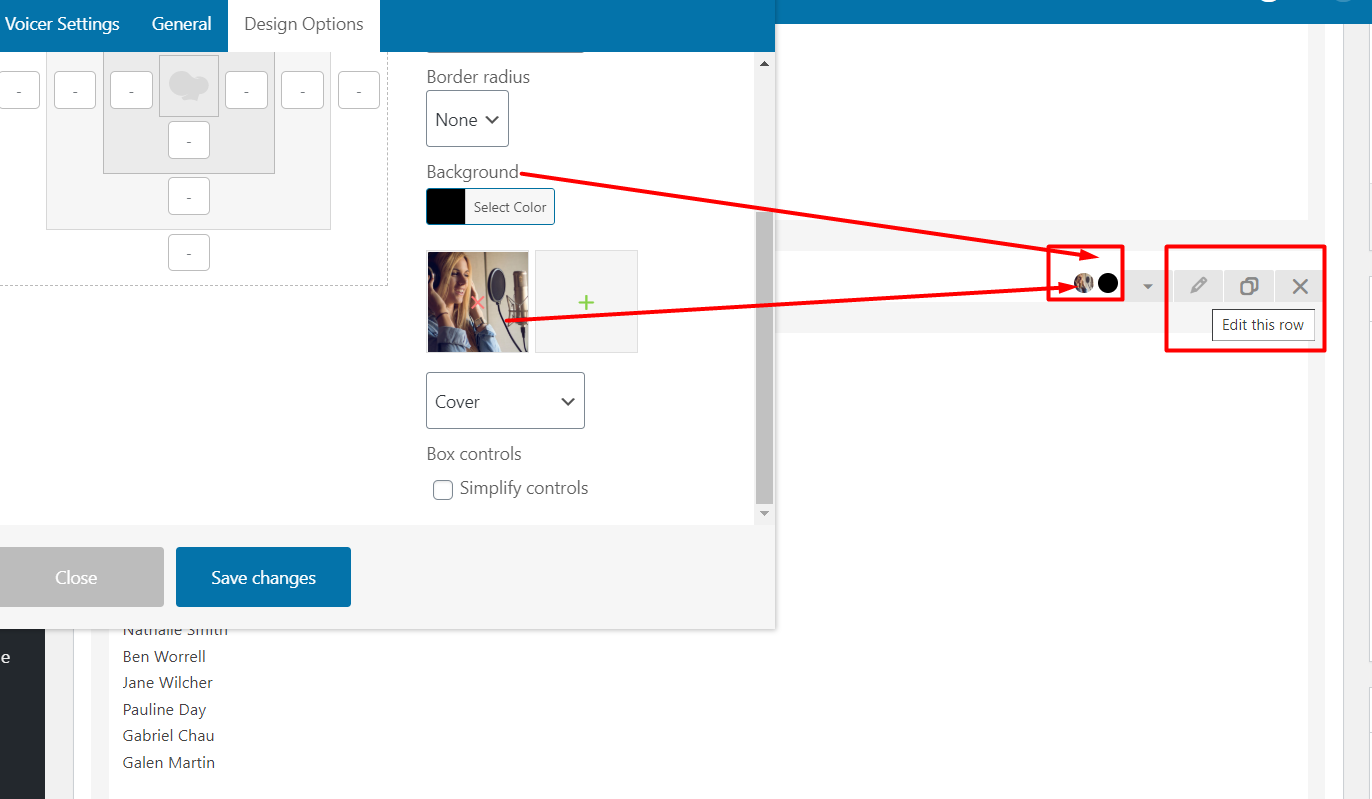
You can change texts, add own image/replace existing images
Also you can change/add background image and (or) background colors of blocks
-
Our theme has own html/css structure, so, in all blocks we reset default WPBakery grids structure by filling such term in the field:
Clean Classes Box: clean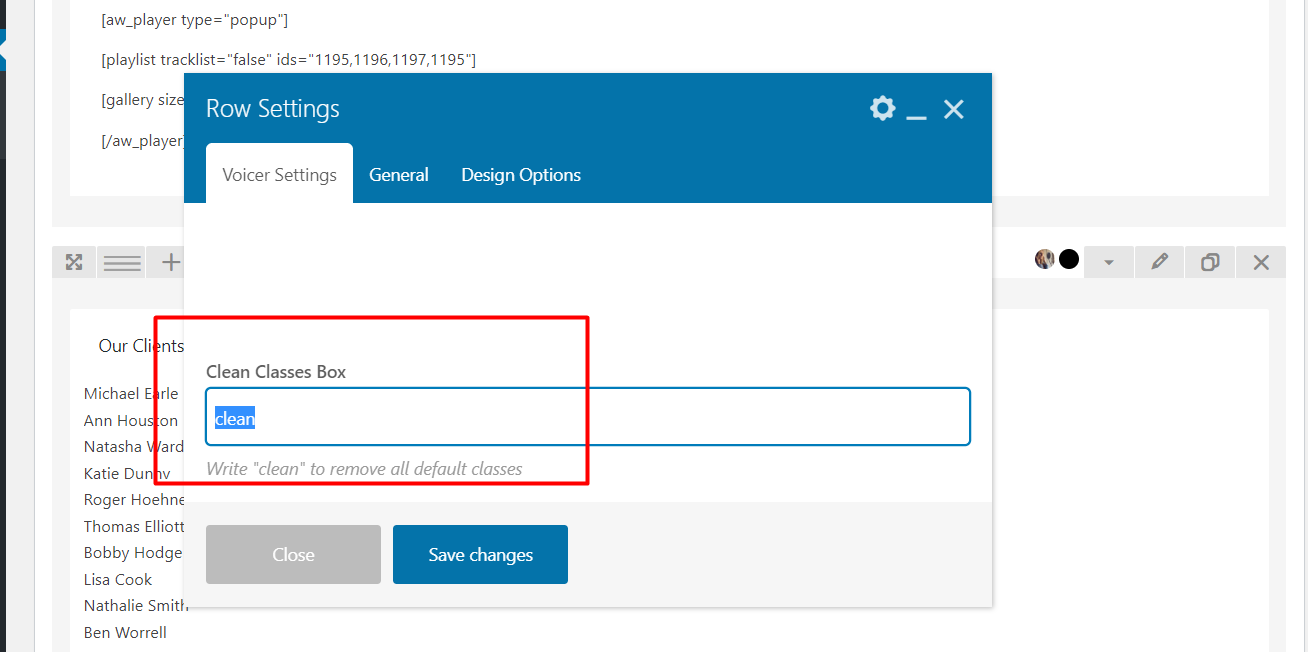
If you need to use default stucture of composer blocks just remove this term here.
But this can broke the theme's structure. So, we recommend to not use this term only if you create own blocks, not in theme's pre-made blocks. -
Please keep attention!
Our theme has specific blocks which have developed specifically for the best design look. Some css/html structure was developed to achieve such design. If you don't have enough css/html skills we recommend to not make changes in css of the blocks.
And to not move them to other pages.
The best way in such case - to change only, texts, images, backgrounds and other options which can't broke page structure.
If some block is fully not match your site - just remove it fully. And create a new block by using Visual composer functionality.
It is fully compatible with the theme. None of it functinality is changed in the theme
About working with the Composer you can read in its default manuals. -
Also please keep in mind that some of options as colors, fonts, backgrounds you can easy change in Appearance -> Customize
All details here
-
Page: Projects
-
Player
About player arrangement, please, read PROJECTS PLAYER, item 3
-
Gallery block
Use WP Bakery composer element Voicer Gallery
In the window keep attentions to fiels:
-
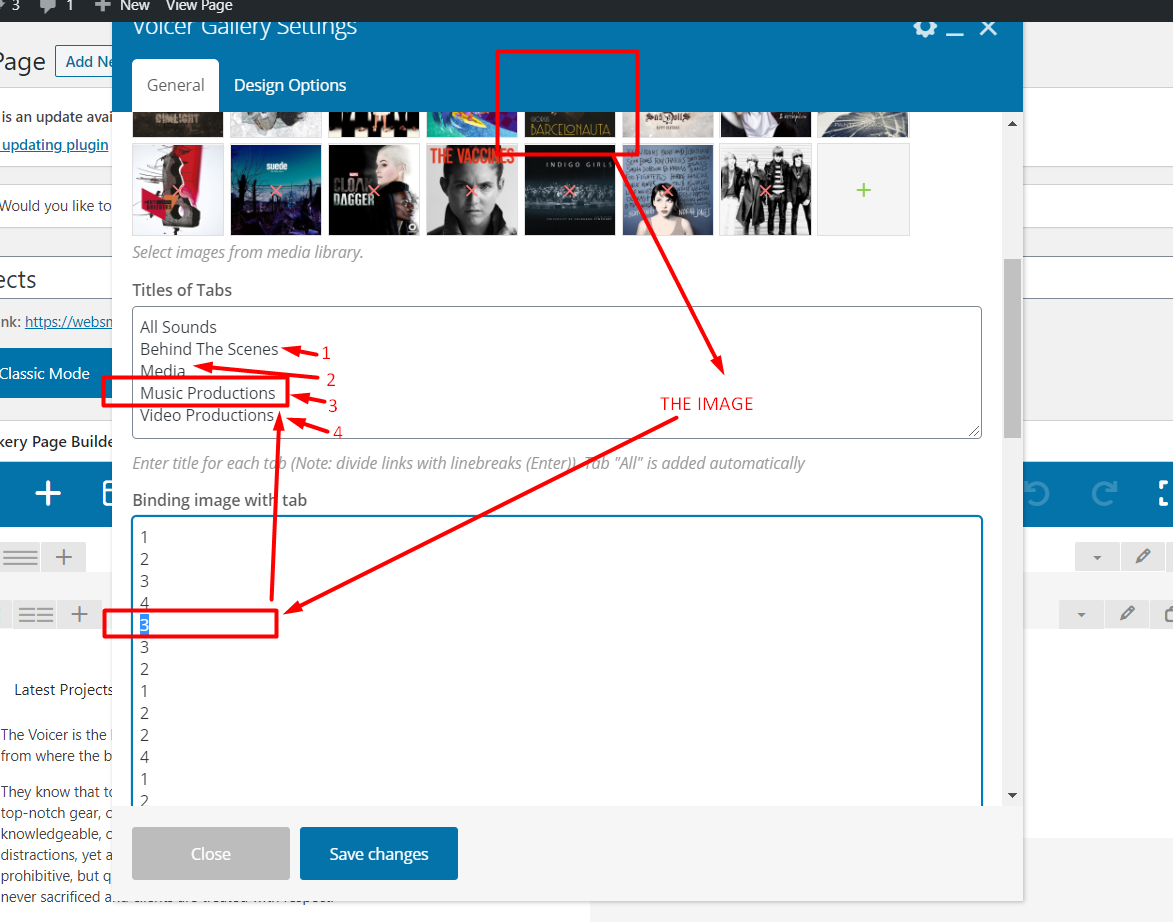
Gallery type - in this block the type "Tabbed Music Image grid" should be choosen
-
Images - independent field
Upload as many images as you need. Keep attention to Images number.
For example, in our demo page it's 15 -
Titles of Tabs - independent field
You can add as many tabs as you need.
Enter title for each tab (Note: divide links with linebreaks (Enter)). Tab "All" is added automatically -
Binding image with tab
This field is connected with the Images and Titles of Tabs fields
Keep attention to this field
Number of columns in this fiels has to be the same as the number of images uploading. In our case it is 15

Numbers what you write in this field detect nuber of tab to which the correpsonding image will be attached
In our example, we have 5 tabs. First tab is for all images, don't keep in mind it.
Use only 4 tabs which are numbered as 1, 2, 3, 4
So, for example, image with number 5 is attached to the tab with number 3. This tab is called in our example "Music Productions"
-
Titles of images grids, Artists names for music tracks, Urls of music tracks
These fields are connected with Images number
-
Theme Custom Settings: COLORS, FONTS SIZES, GOOGLE FONTS
-
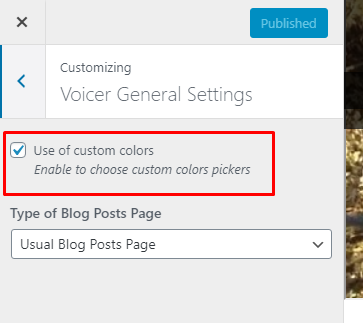
Activate using of custom options
Go in Appearance -> Customize -> Voicer General Settings -> Use of custom colors
-
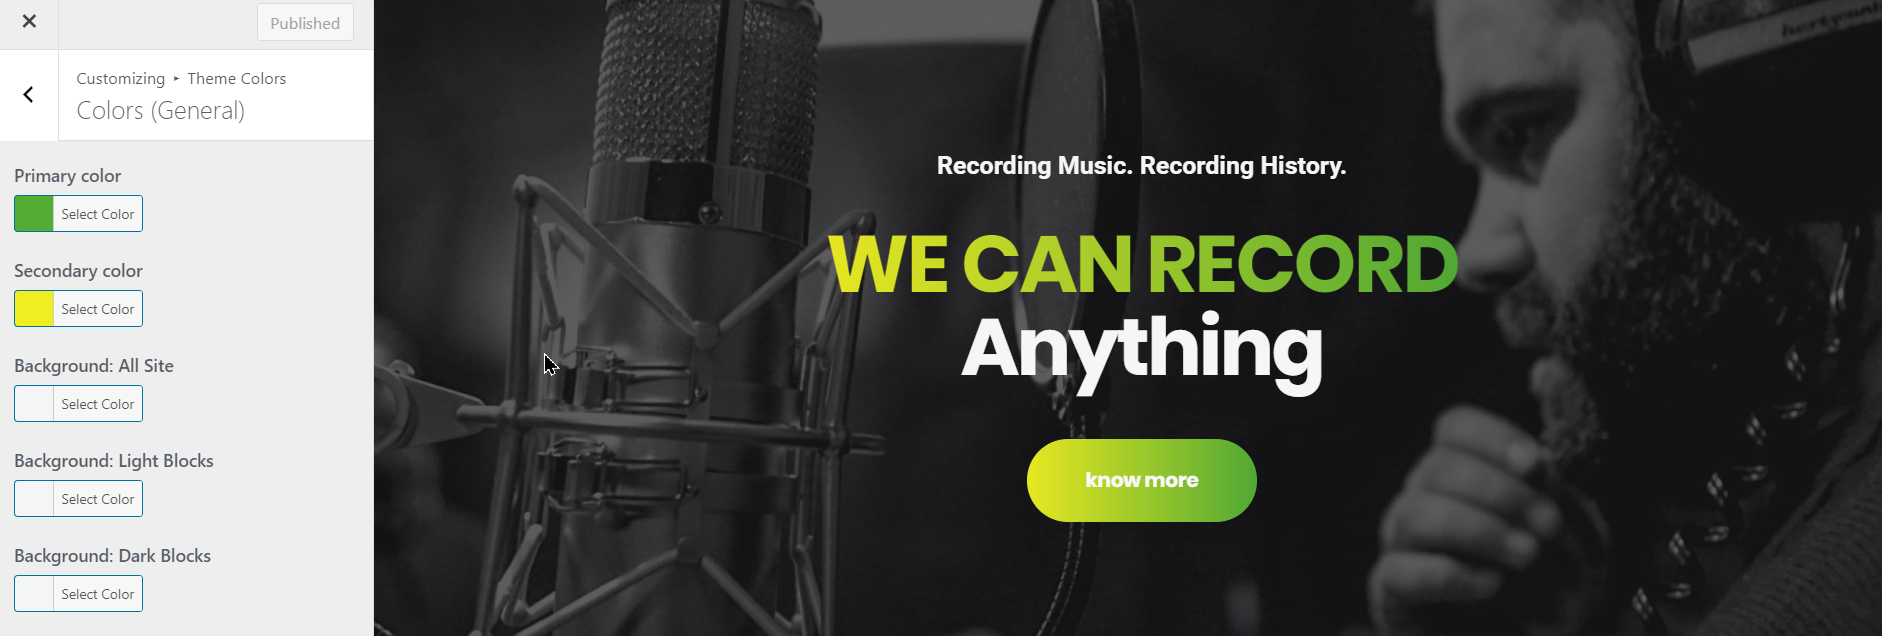
COLORS
Go in Appearance -> Customize -> Theme colors, change them if you need and press Publish button
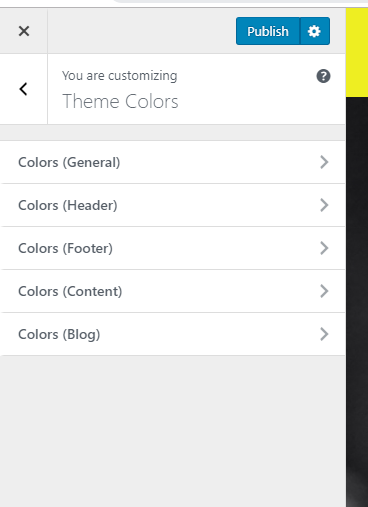
Main colors of the theme
For example, to change the main theme colors (which are orange and purple by default):
Go in Appearance -> Customize -> Theme colors -> Colors (General)
Use fields:
- Primary color
- Secondary color
-
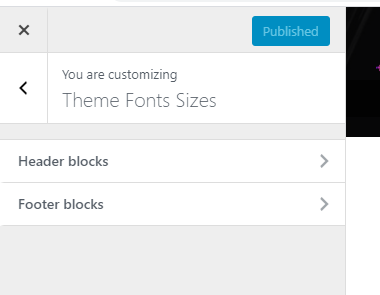
FONTS SIZES
Go in Appearance -> Customize -> Theme Fonts Sizes, change them if you need and press Publish button
-
GOOGLE FONTS
Go in Appearance -> Customize -> Theme Google Fonts, change them if you need and press Publish button
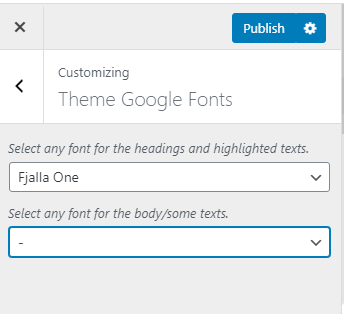
If you need to change only one font you may left the other one as "-" symbol
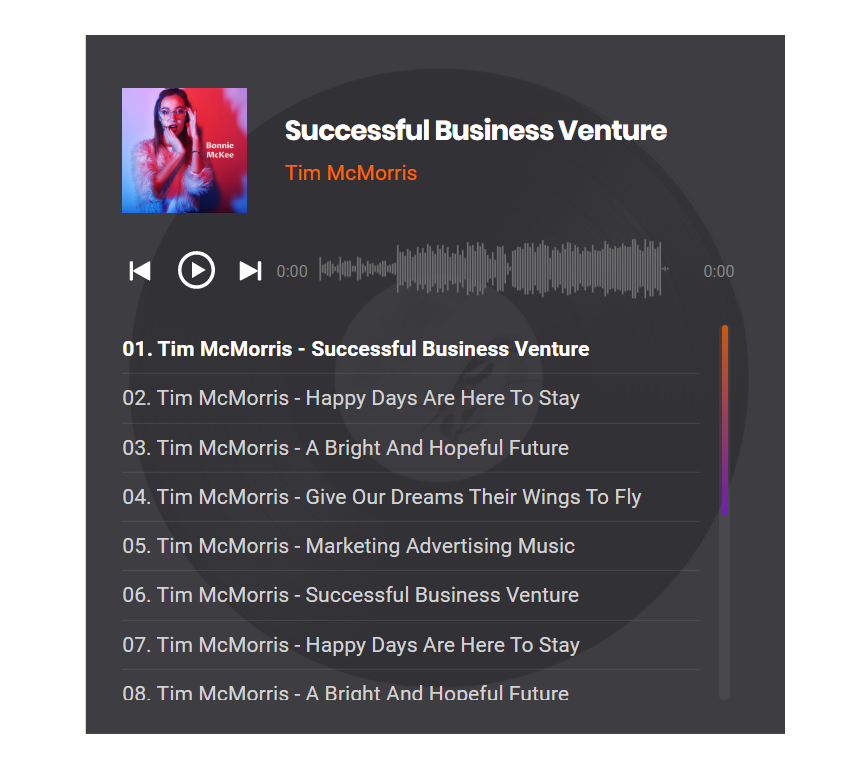
Audio Players
Our Theme includes 3 pre-built Audio players based on Audio Waveform Player. It is responsive HTML5 based audio plugin. It creates waveform from audio track automatically and displays it as a seekbar. It support self hosted audio mp3 files and some other external music services like Soundcloud, Podcasts, Google Drive Storage etc…
Common shortcode view for all player types: [aw_player type="{home/popup/projects}"][playlist ...][/aw_player].
If you want to add more options for the player, you can find the Audio Waveform Player related Documentation in the folder documentation/awp-player.
Change/remove tracks information: title/artist:
-
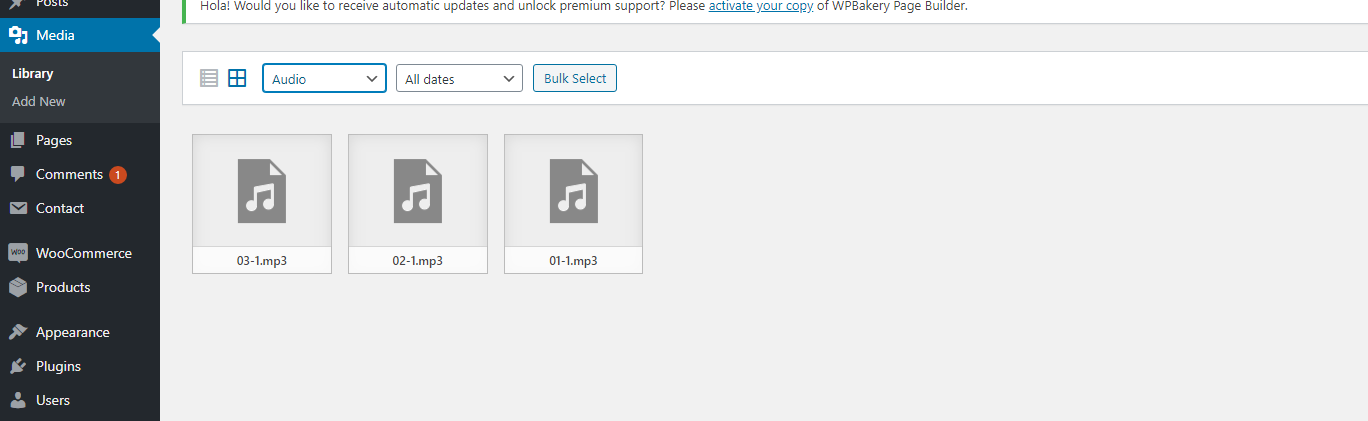
Open a track in admin left menu: Media
Choose sorting type as Audio to display tracks only, click a track
-
In the opened window in right part with track options change parameters to yours
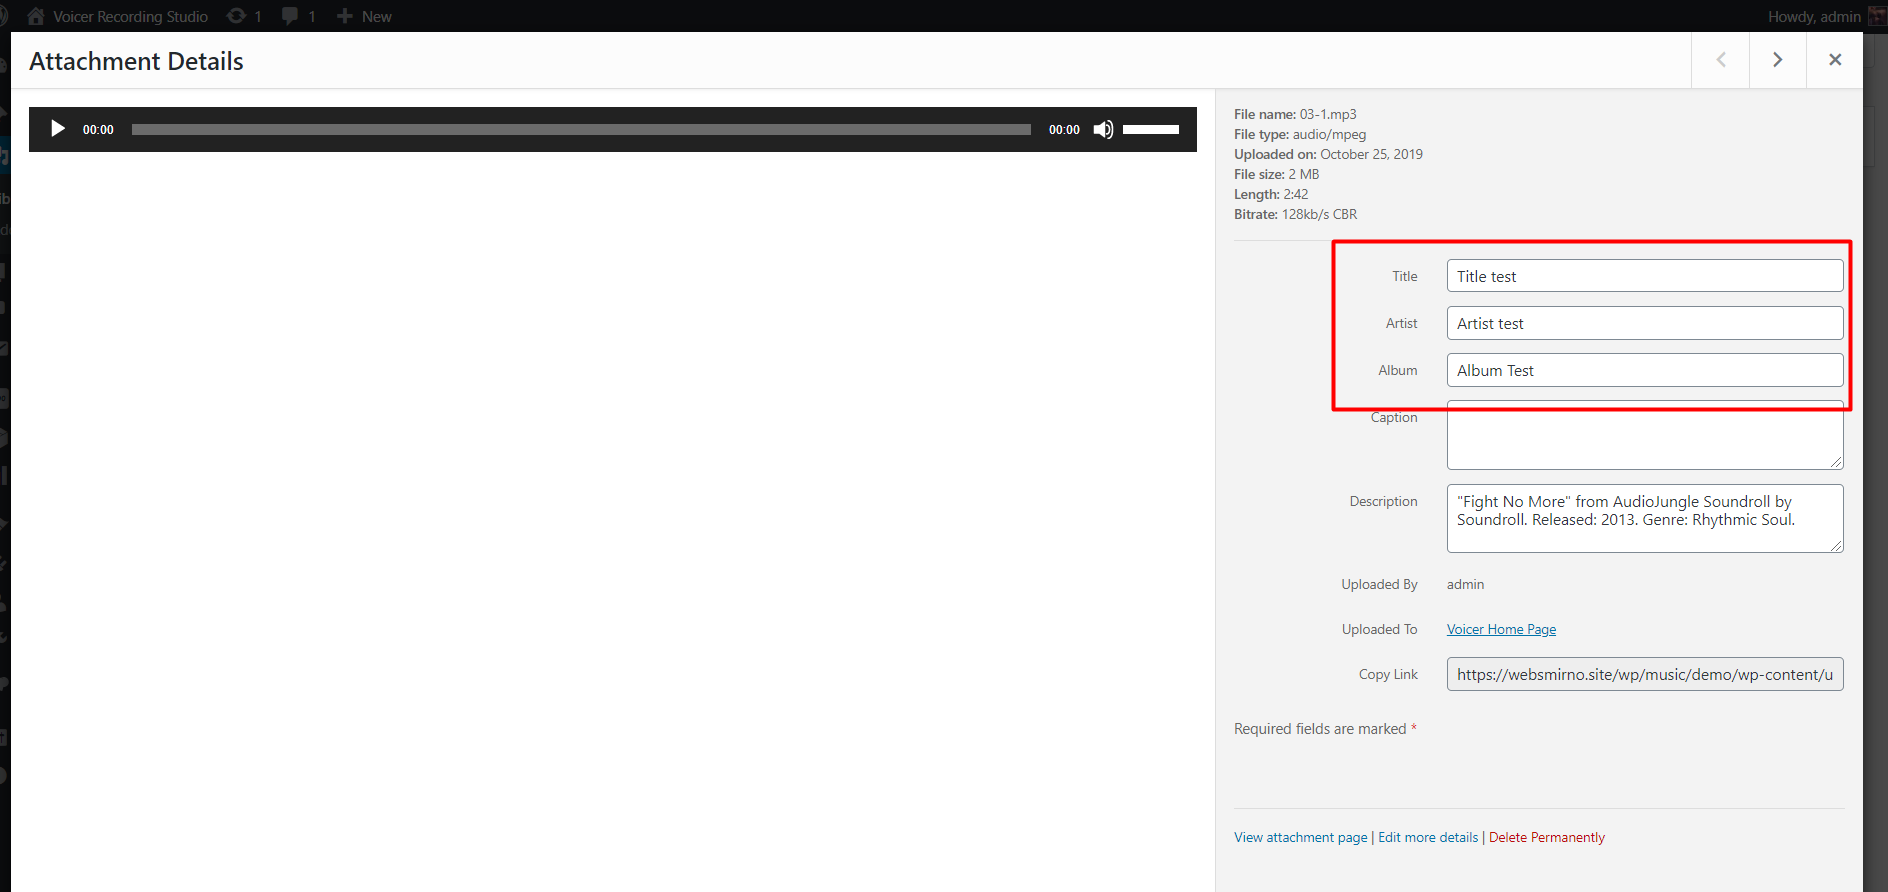
-
Finally check what settings are choosen in a player block
Type of player in shortcode:
-
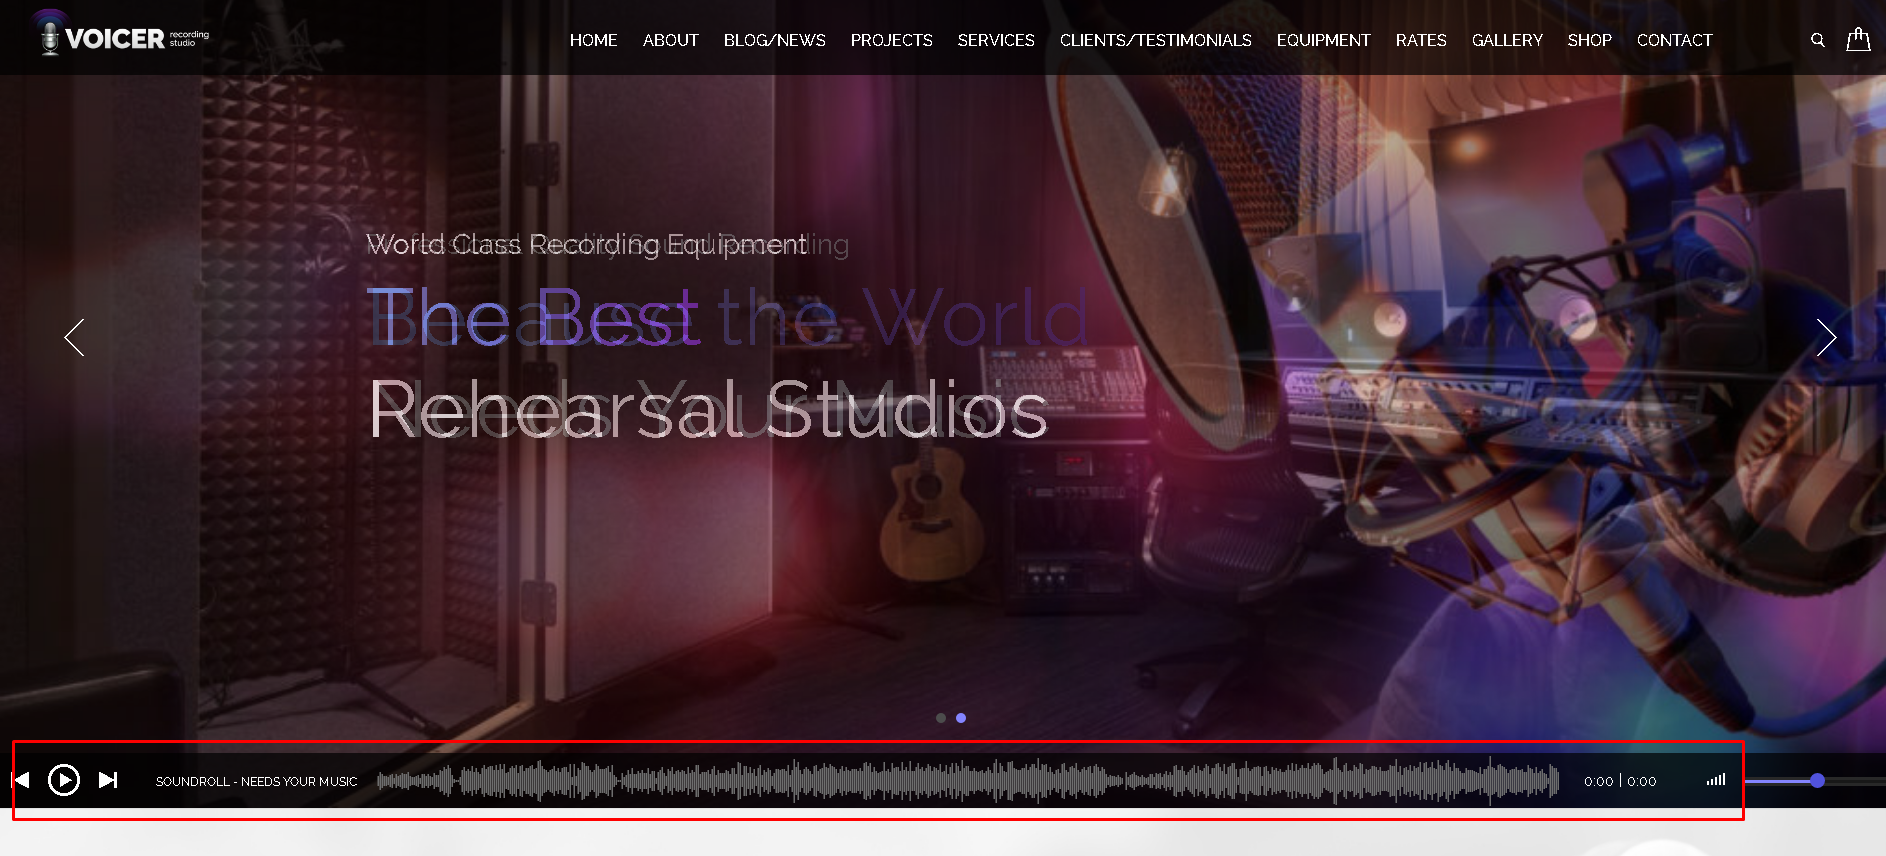
1) Home player
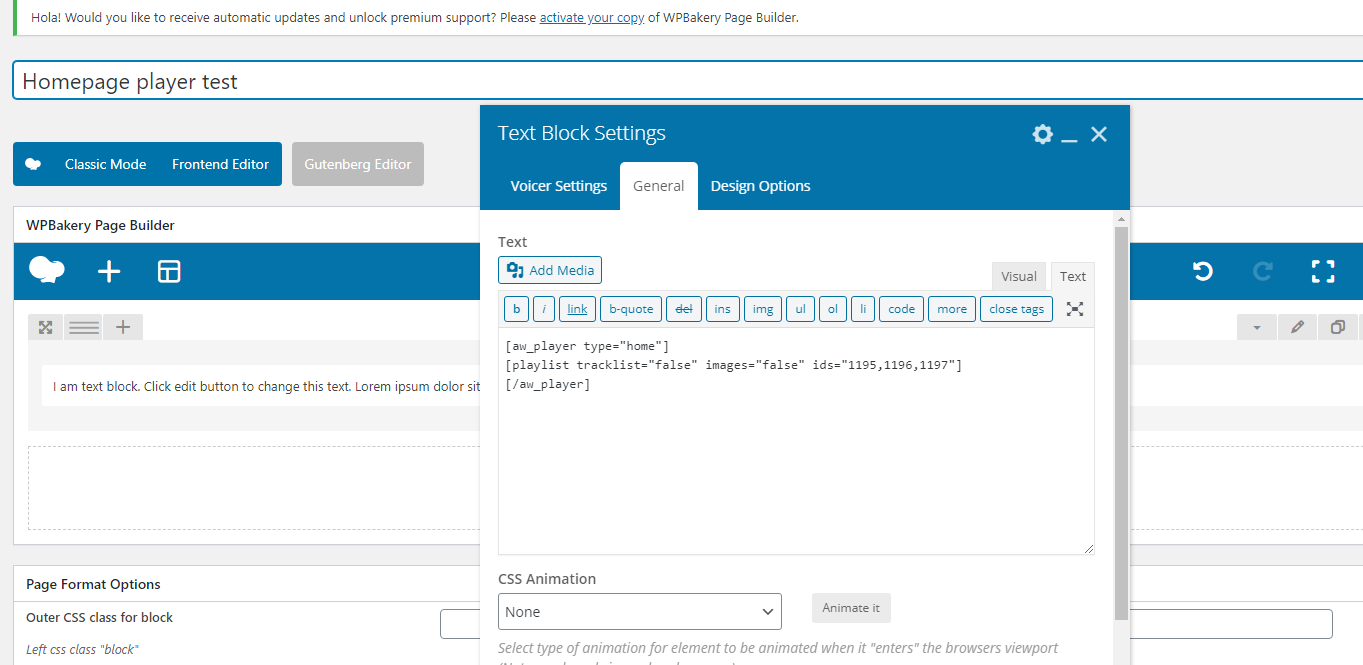
Shortcode example for Home Page player (under Voicer Main Slider):
Original demo code:
These numbers are examples from demo. But you have to upload your own tracks. And you will see your numbers here.
To change tracks in Homepage player to your own:
-
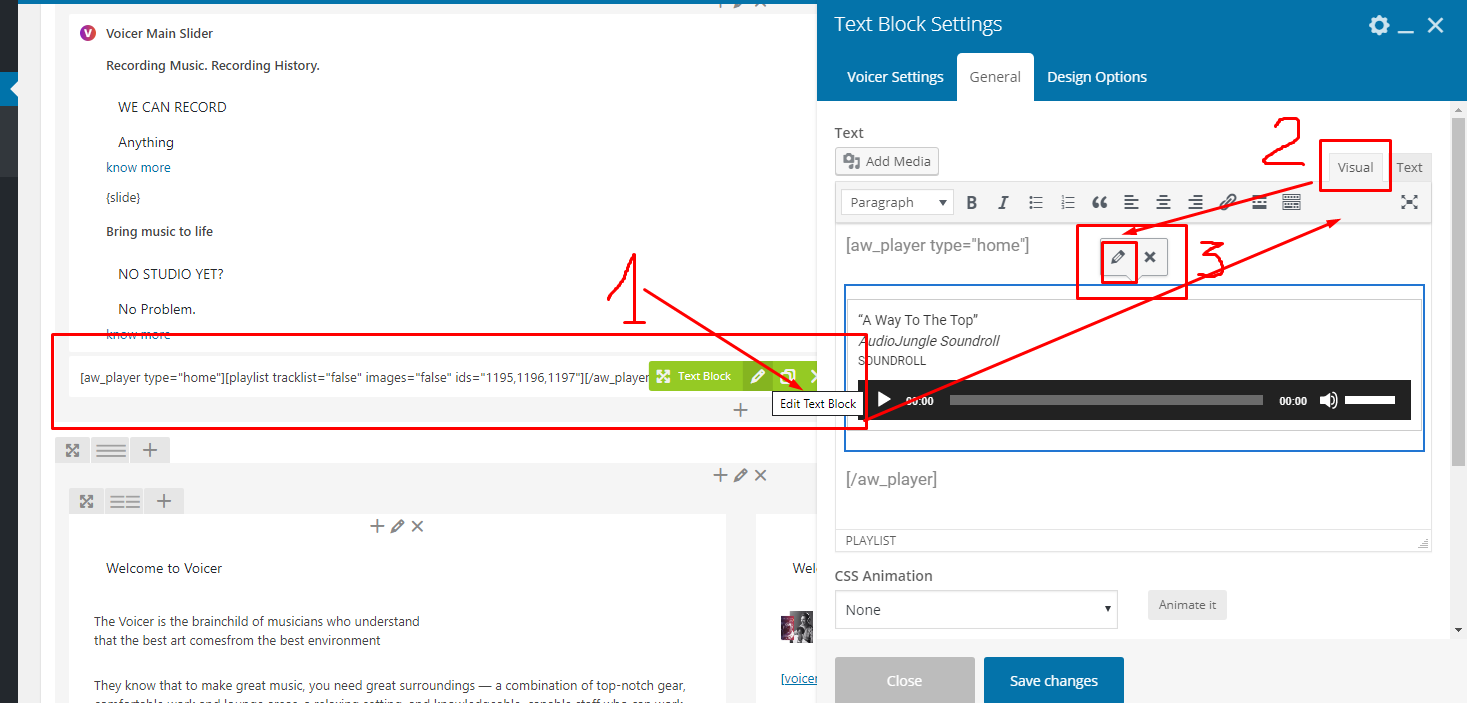
Go in admin left menu: Pages -> Voicer Home Page
- Open Text block with player shortcode
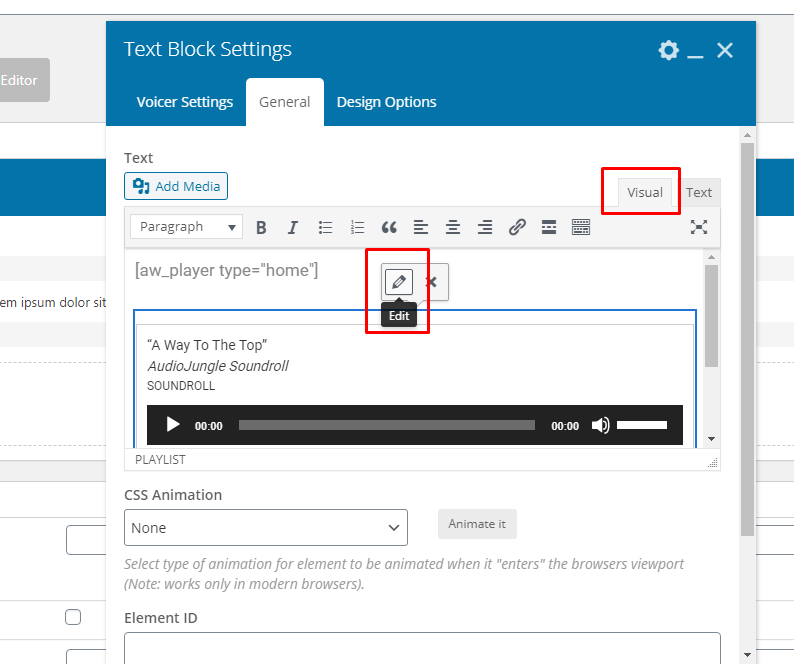
- In the popup window press the button Visual (not Text view)
- In the visual mode click on player block and press the "pencil" button Edit.
-
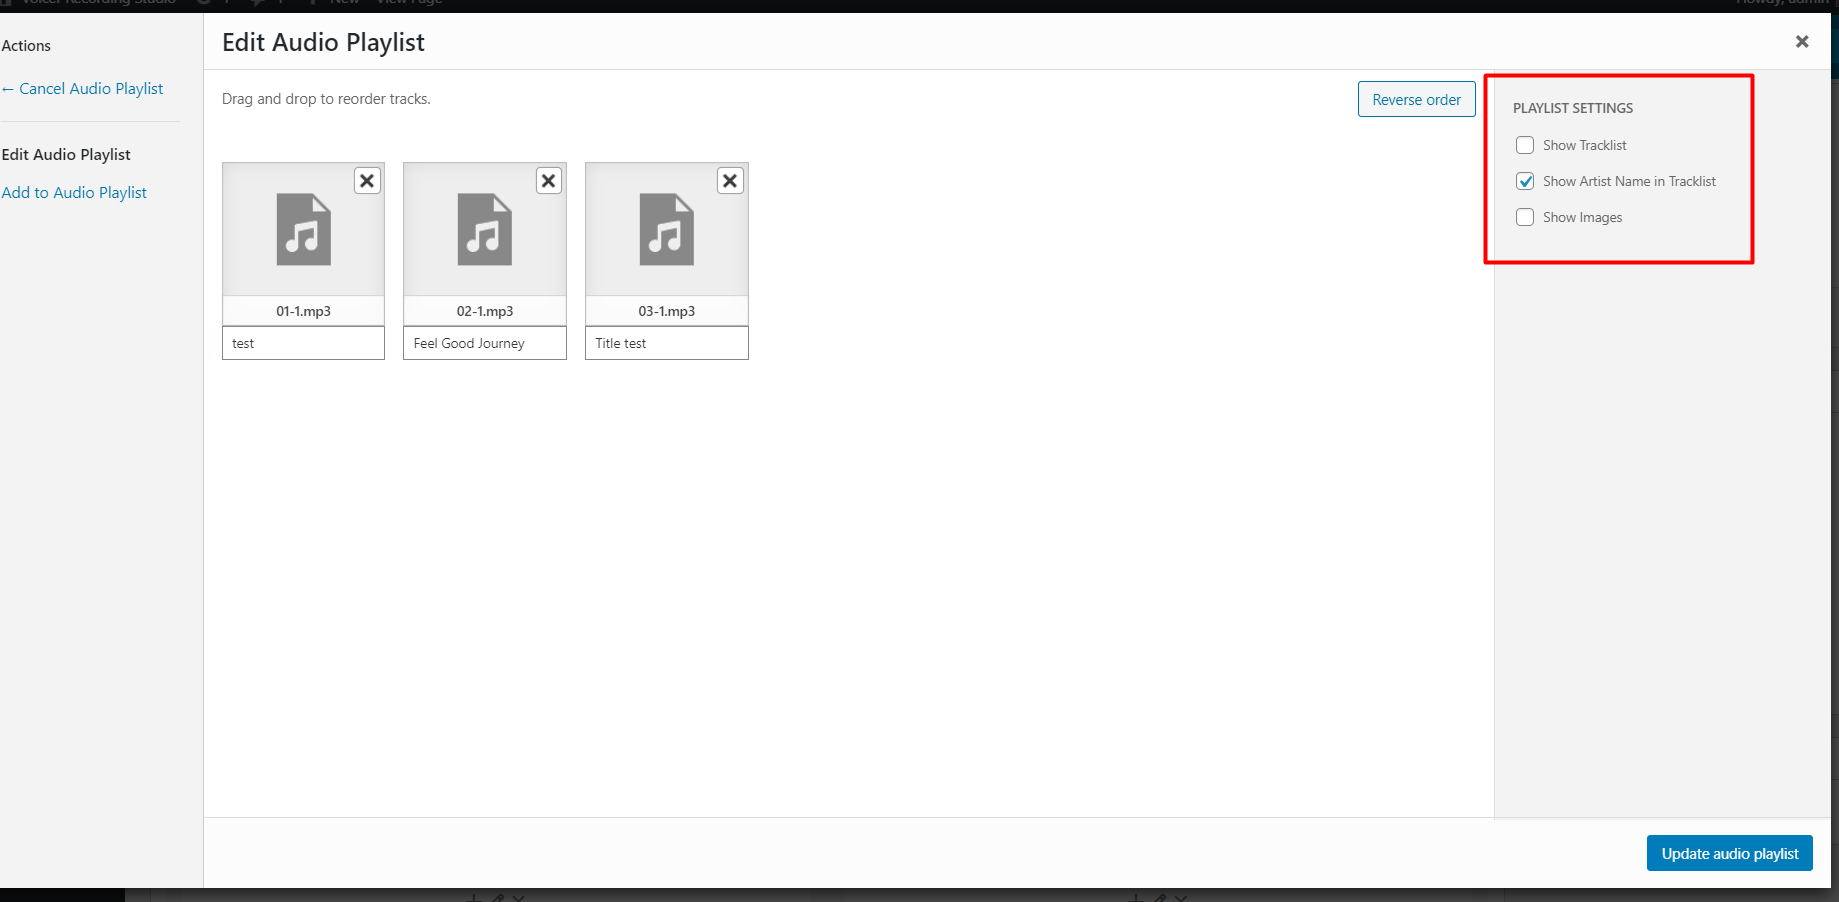
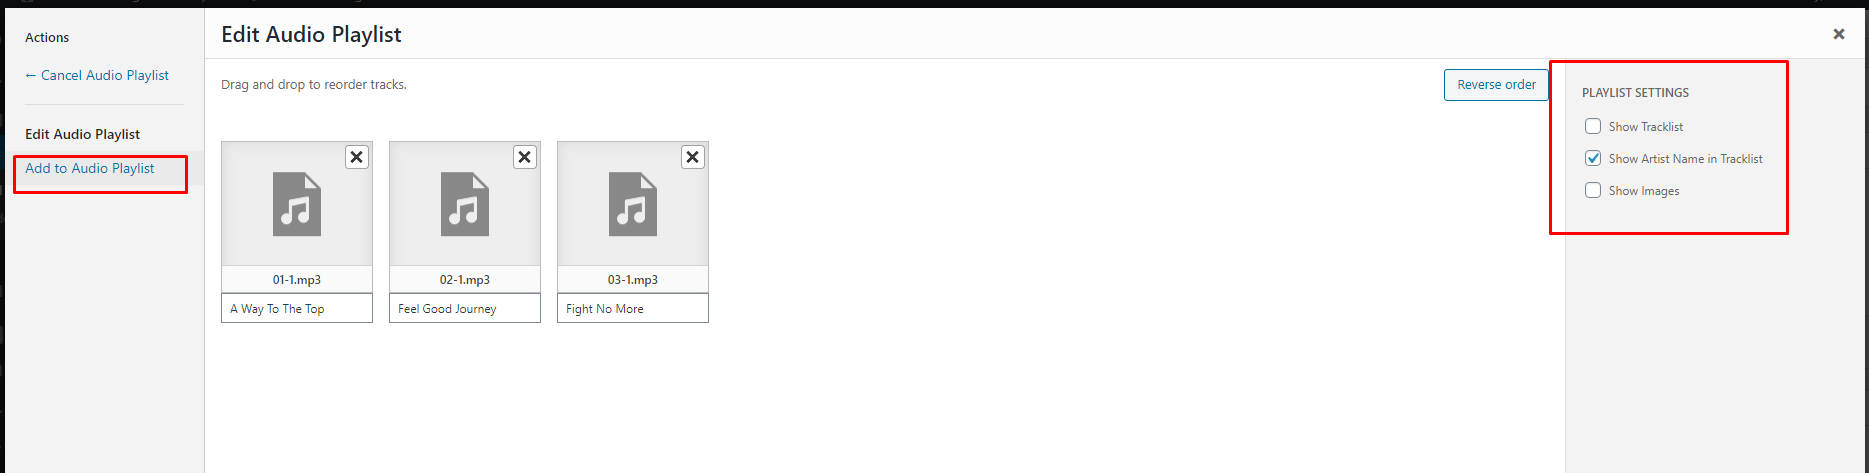
In the opened window press "Add to Audio Playlist". Example, track can be removed by clicking X
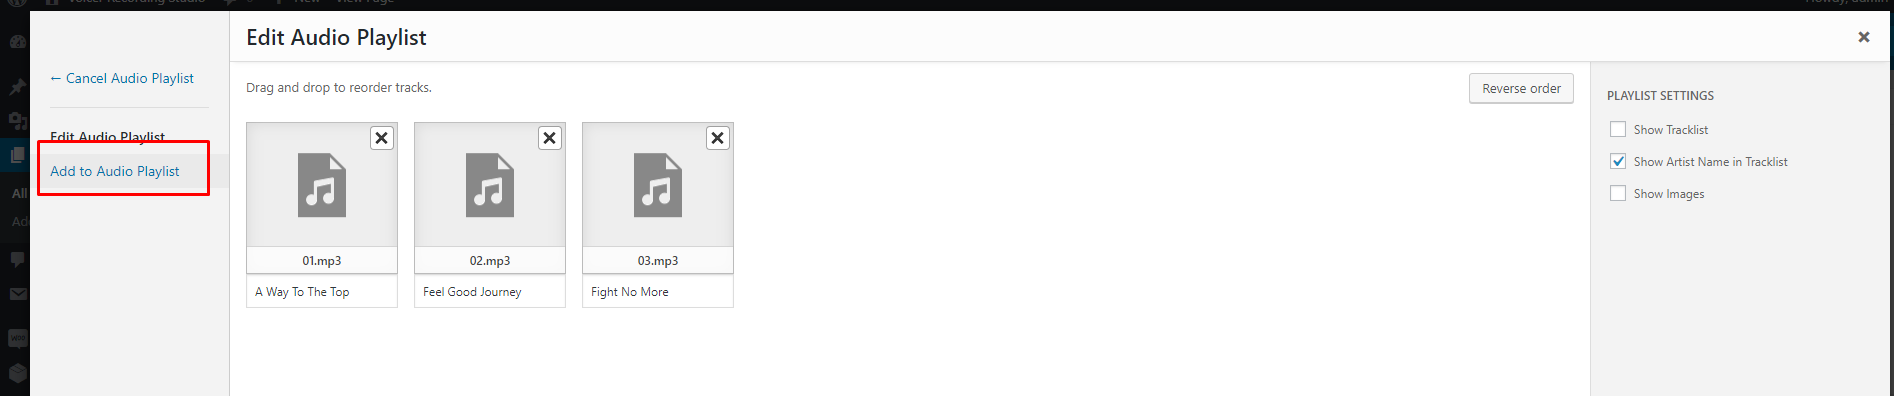
- Save whole page.
-
-
2) popup player
Type of the player view is set if clicked by grid located tracks in the Home page -> block Our Projects
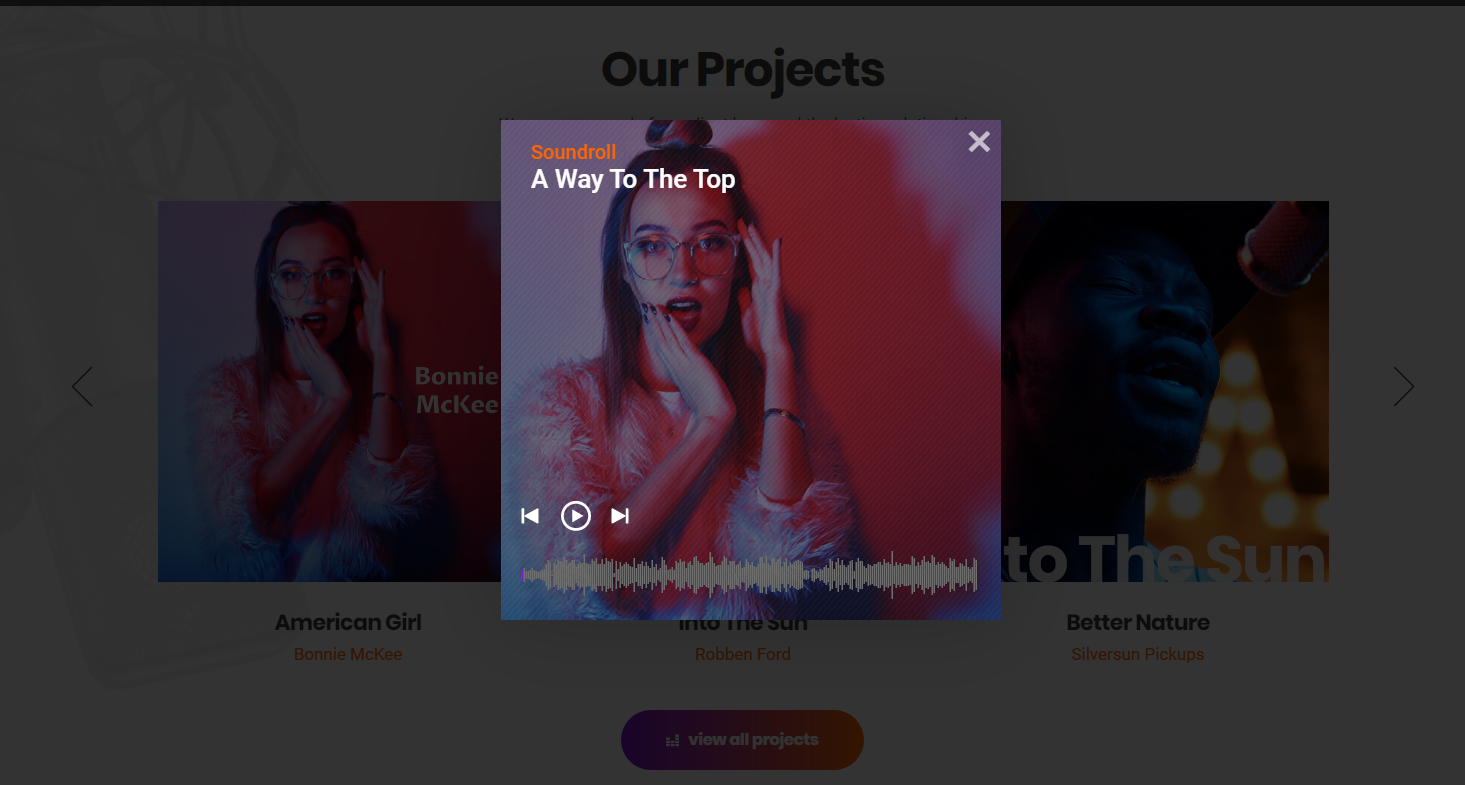
Original demo code:
These numbers are examples from demo. But you have to upload your own tracks. And you will see your numbers here.
To change tracks in Project player to your own:
-
Go in admin left menu: Pages -> Home page, scroll to the block Our Projects
- Open Text block with player shortcode
- In the popup window press the button Visual (not Text view)
- In the visual mode click on player block and press the "pencil" button Edit.
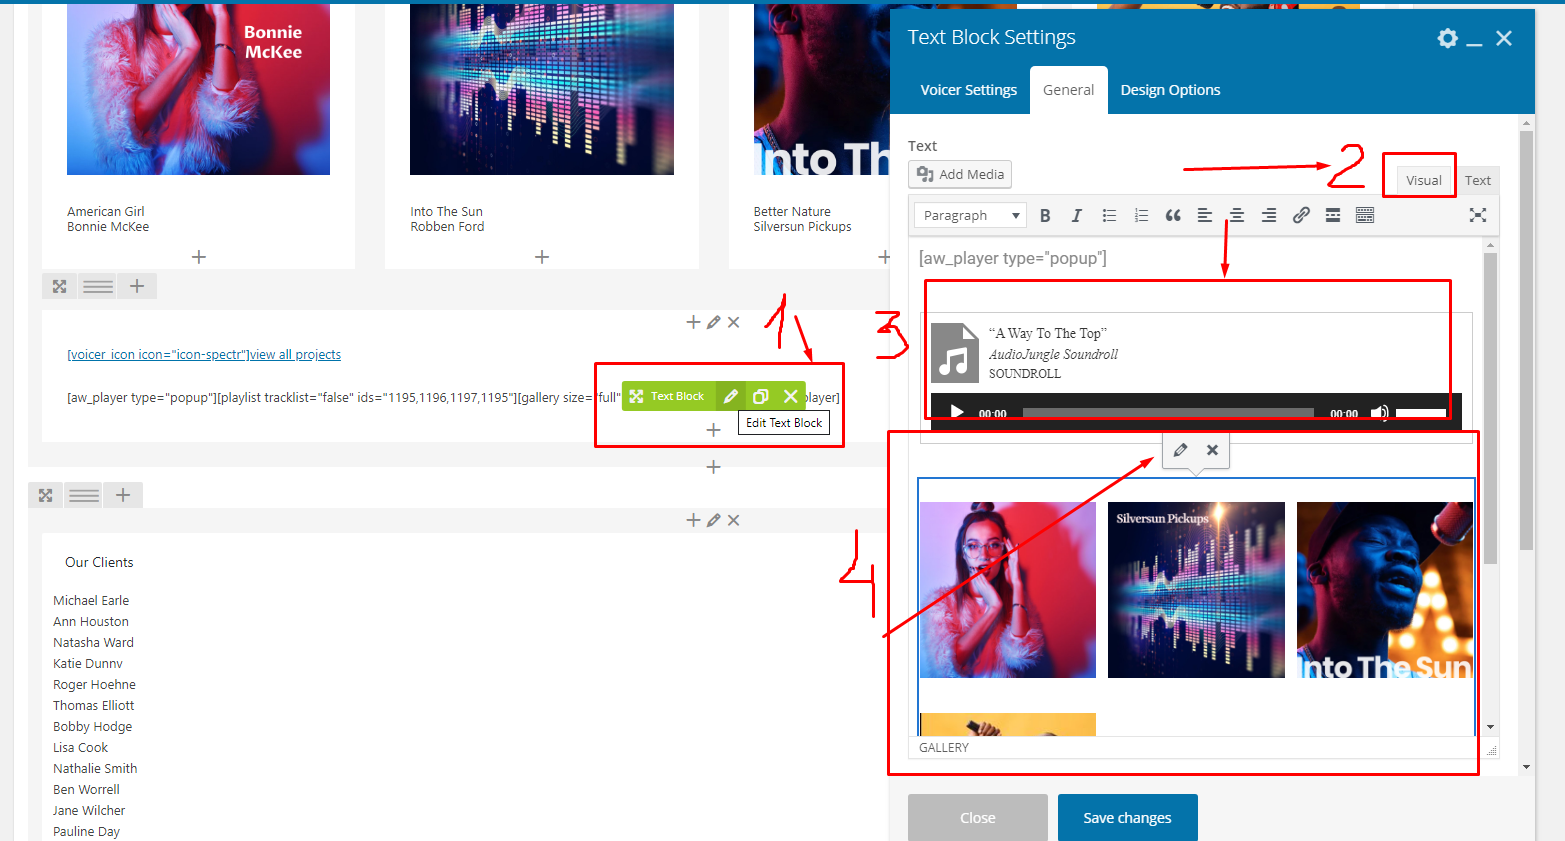
-
In the opened window press "Add to Audio Playlist". Example, track can be removed by clicking X
-
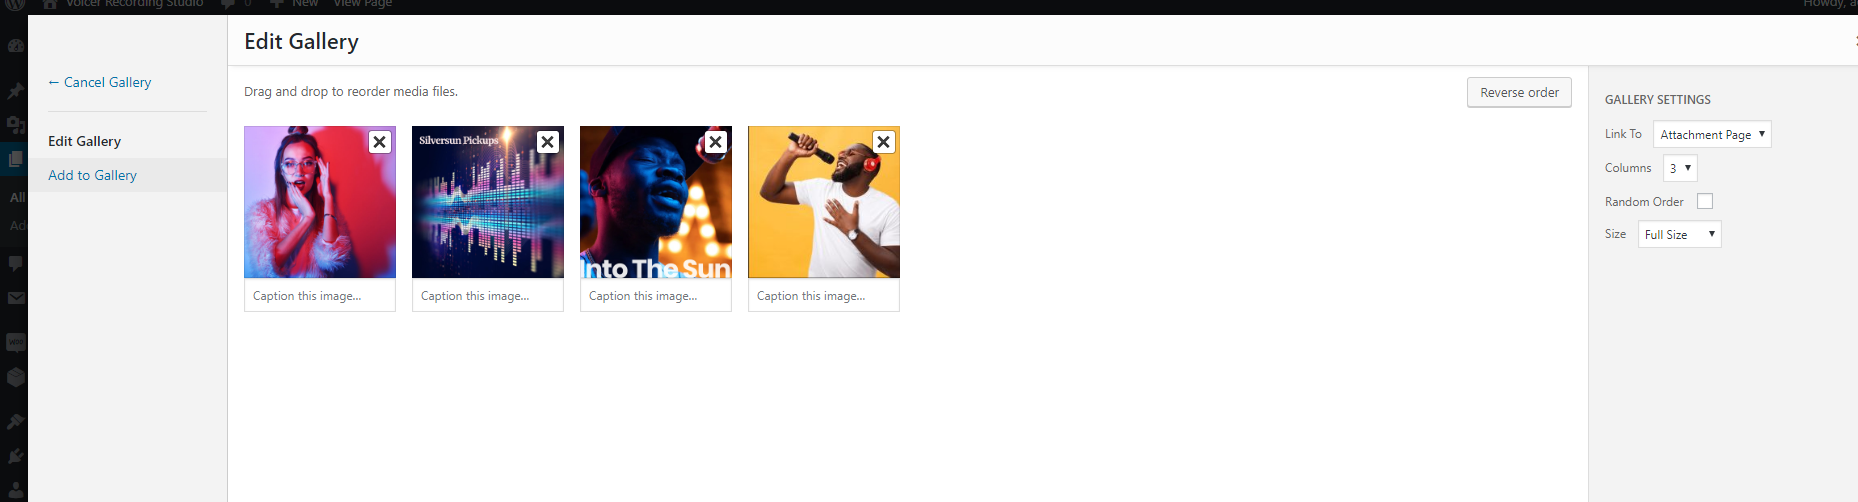
Edit Gallery in the same way as tracks: click on it and press "pencils" button Edit. Add/remove images
- Save Text block and save whole page.
-
-
3) projects player
Type of the player view is set on Projects page, can be find in the admin page: Pages -> Projects
Original demo code:
These numbers are examples from demo. But you have to upload your own tracks. And you will see your numbers here.
To change tracks in Project player to your own:
-
Go in admin left menu: Pages -> Projects
- Open Text block with player shortcode
- In the popup window press the button Visual (not Text view)
- In the visual mode click on player block and press the "pencil" button Edit.

-
In the opened window press "Add to Audio Playlist". Example, track can be removed by clicking X
-
Edit Gallery in the same way as tracks: click on it and press "pencils" button Edit. Add/remove images
- Save Text block and save whole page.
-
Icons
Voicer WordPress Theme uses simply and flexible icon library Flaticon.
Icons are inserted in view of svg codes.
How to Add the New Icon(s)
Shortcode example:
[voicer_icon icon="icon-facebook-logo" link="www.facebook.com" class="hovicon"]
Shortcode parameters:
Full list of icon types you can find here - MAIN ICONS LIST
-
link - not required parameter. If you add it you will see icon wrapper in view of
<a href="your_link"><svg class="icon icon-"....>..</svg></a> -
class - not required parameter. If you add only it and no link you will see an icon in div wrapper
-
name - not required parameter. Attribute "title" if icon wrapper is link.
-
target - not required parameter. Attribute "target" if icon wrapper is link.
For example, target="blank" will be trasformed as target="_blank"
Examples of possible icons view:
| Icon code | Frontend html |
[voicer_icon icon="icon-facebook-logo"] |
<svg class="icon icon-facebook-logo">....>..</svg> |
[voicer_icon icon="icon-facebook-logo" class="hovicon"] |
<div class="hovicon"><svg class="icon icon-facebook-logo">....>..</svg></div> |
[voicer_icon icon="icon-facebook-logo" name="facebook" target="blank" link="www.facebook.com" class="hovicon"] |
<a class="hovicon" href="www.facebook.com" target="_blank" title="facebook"><svg class="icon icon-facebook-logo">....>..</svg></a> |
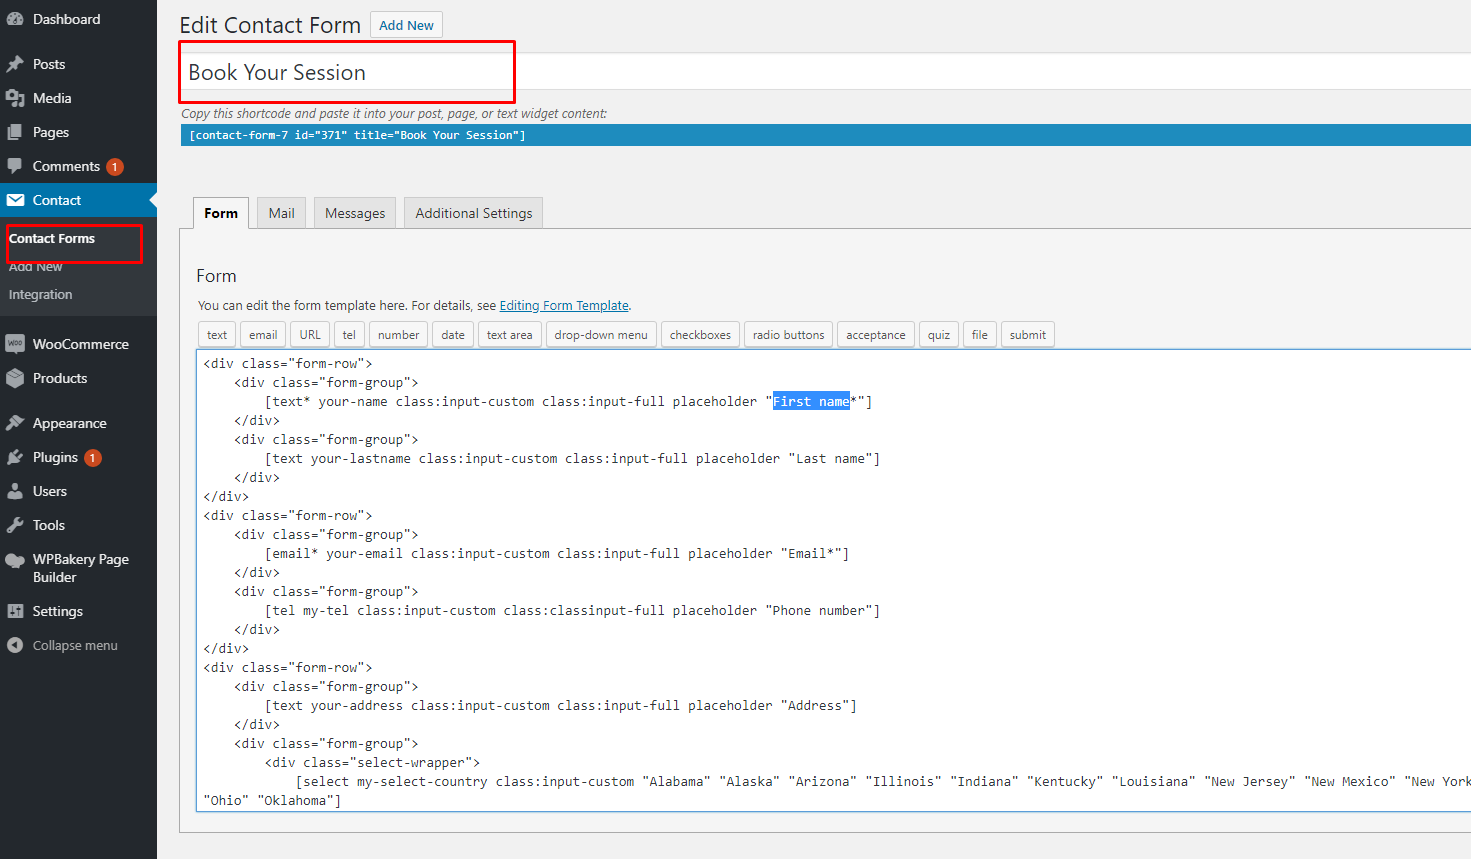
Forms Arrangement
After some layout installed you can edit all original forms in the admin left menu: Contact -> Contact Forms
Here you can change parameters to yours
-
In the theme we use plugin Contact Form 7
If you have any not clear moments about forms work and parameters in them you should read the official manuals of the plugin.
There are no changes of the core plugin functionality in our theme.
Pay attention to form configuration
-
Open some form in admin: Contact -> Contact Forms, tab Mail -> Message body
The code in it outputs a mail which will be seen to your after client writes something
-
For example we have such code:
From: [your-name]-[your-email],
Message Body:
[your-message]There are 3 variables: your-name, your-email, your-message
Each of them has to be placed in the code of corresponding form

-
So, open tab Form and insert each of variable

You can use more variables, create more form fields and write them in the Message body for your convenience
-
-
To use captcha functionality in your forms we recommend such plugin - Really Simple CAPTCHA
It is developed by the same developers as forms plugin which we use for our forms (Contact form 7). So, it can be easy to integrated in each form.The plugin requires SSL management on your site. To do this you can use such plugin - Really Simple SSL
-
Booking form
Original code for the form
Original code for the form with using captcha
-
Newsletter form
Original code for the form
Original code for the form with using captcha
-
Contact Us form
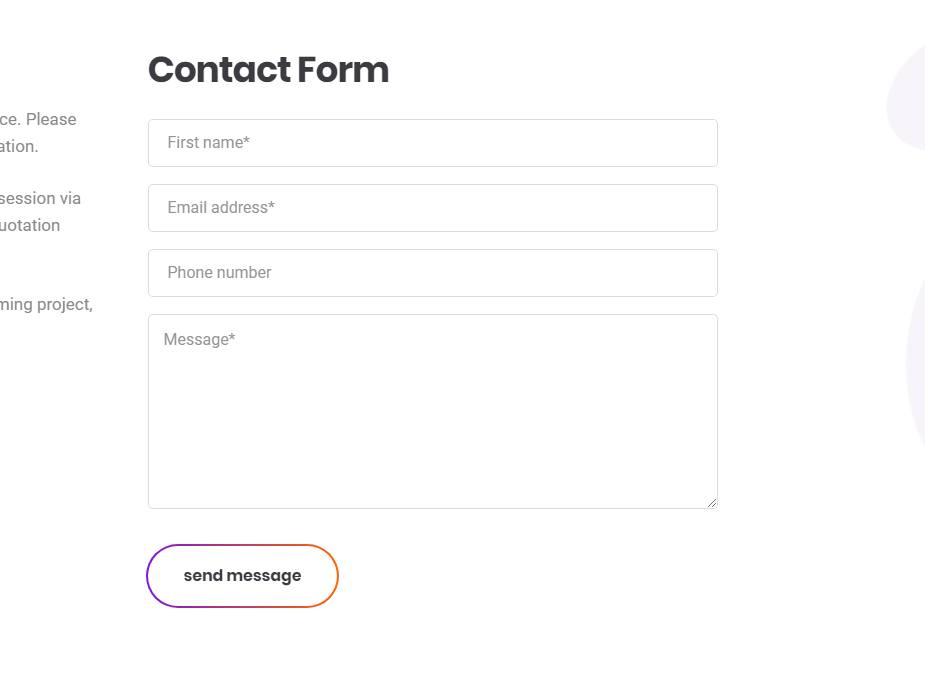
Original code for the form
Original code for the form with using captcha
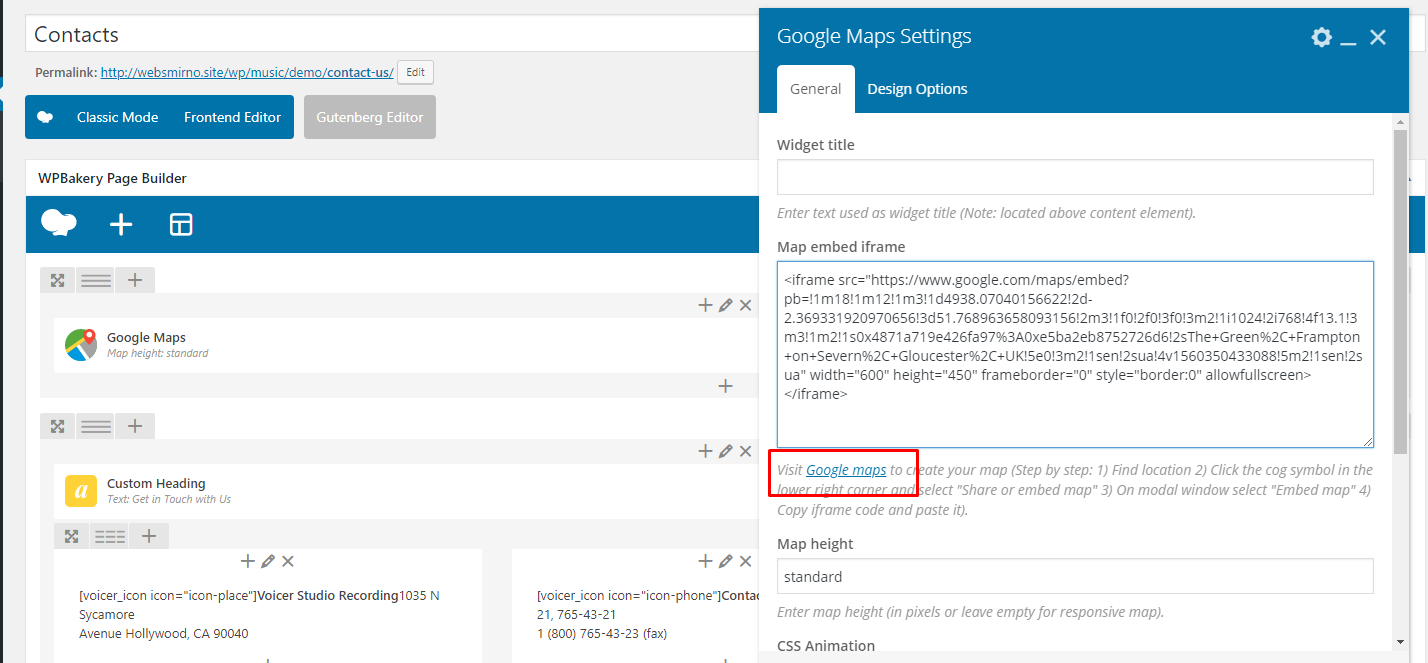
Google Maps
Map on "Our Contacts" page
Open Pages -> Our Contacts page.
Press Backend editor button if it wasn't pressed. Open VC element and make own changes
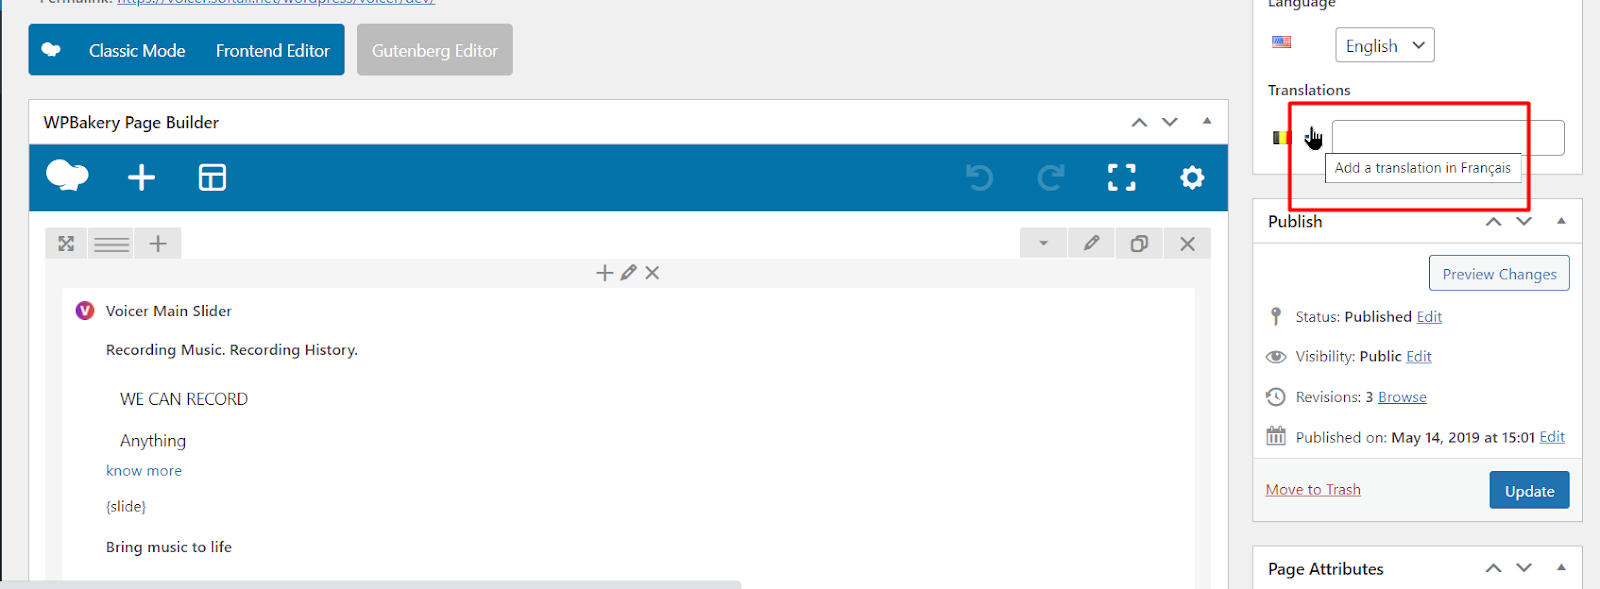
Translation
Recommended plugins
There are two plugins which can help you with fast translation of our theme. We've checked and used them on our demo.
-
Polylang
This plugin is used to translate theme's pages, posts, widgets,some strings
-
Loco Translate
This plugin is useful to translate local constants which are located in the theme's folder: languages/voicer.pot file
You can use either this plugin or Poedit program.
We recommends Loco Translate plugin because it allows to make translation and save them in admin interface. Without local opening of the file.Poedit is a common program which you can use to translate the theme. It’s available for free on poedit.net. After you have installed Poedit, you can open it and select File > New Catalog from POT file. Then select the .pot file from the theme you wish to translate which you can find in the /languages/ folder of theme. Then go through every line of text and translate it to your native language. Afterwards you can save the catalog with your language code (for example es_ES.po). Normally Poedit automatically creates the .mo file and saves it, too. The last step you have to do is to upload your created language files to the language folder of your theme using FTP.
Examples
-
Translation of a page
Firstly, you open a current homepage and press on the + button
Then copy the same content from the English version to your language version.

Pay attention to the page options:
Page Format Options -> Not display title from admin field "Title"
Page Attributes -> Template -> Voicer Template -
Forms
You have to create each form for each language. Go in admin: Contact -> Contact Forms. Create the new form, translate all texts and copy the shortcode of the corresponding form.

For each page you have to create separate pages. So, go to the page with new language and insert the copied shortcode.

JavaScript
Custom JS file is located at theme's js folder. All external JS plugins are located at js/vendor folder.
If you need more information about external plugins, please visit plugins official sites.
HTML Structure
The body part of the HTML file is divided in three main sections: header, content and footer.
HEADER

Header HTML structure:
Header Navigation
Default menu HTML structure:
Navigation menu in resolution more than 1199px looks like horizontal navbar. And navigation menu is collapsed for smaller viewports:

Content
Content HTML structure:
.... Section ContentSection Titte
Section Tilte
Section Content
FOOTER
Footer toggle HTML structure:
Grid System
Bootstrap's grid system allows up to 12 columns across the page.
If you do not want to use all 12 column individually, you can group the columns together to create wider columns:
| span 1 | span 1 | span 1 | span 1 | span 1 | span 1 | span 1 | span 1 | span 1 | span 1 | span 1 | span 1 |
| span 4 | span 4 | span 4 | |||||||||
| span 4 | span 8 | ||||||||||
| span 6 | span 6 | ||||||||||
| span 12 | |||||||||||
Bootstrap's grid system is responsive, and the columns will re-arrange depending on the screen size: On a big screen it might look better with the content organized in three columns, but on a small screen it would be better if the content items were stacked on top of each other.
Grid System Rules
Some Bootstrap 4 grid system rules:
- Rows must be placed within a
.container(fixed-width) or.container-fluid(full-width) for proper alignment and padding - Use rows to create horizontal groups of columns
- Content should be placed within columns, and only columns may be immediate children of rows
- Predefined classes like
.rowand.col-sm-4are available for quickly making grid layouts - Columns create gutters (gaps between column content) via padding. That padding is offset in rows for the first and last column via negative margin on
.rows - Grid columns are created by specifying the number of 12 available columns you wish to span. For example, three equal columns would use three
.col-sm-4 - Column widths are in percentage, so they are always fluid and sized relative to their parent element
- The biggest difference between Bootstrap 3 and Bootstrap 4 is that Bootstrap 4 now uses flexbox, instead of floats. One big advantage with flexbox is that grid columns without a specified width will automatically layout as equal width columns. Example: Three elements with
.col-smwill each automatically be 33.33% wide from the small breakpoint and up. Tip: If you want to learn more about Flexbox, you can read our CSS Flexbox Tutorial
Basic Structure of a Bootstrap 4 Grid
The following is a basic structure of a Bootstrap 4 grid:
Read more about bootstrap 4 grid here: https://www.w3schools.com/bootstrap4/bootstrap_grid_system.asp
Short Examples
-
Example 01: Add Home page player with own tracks on clean page
-
Upload all your tracks in admin: Media
- Create clean page in admin left menu: Pages
-
Press Text button and add demo shortcode from home player, item 1 like this
-
In this Text element press Visual button, hover on player and press Edit button
-
Choose tracks, arrange player settings
-
Test page on our demo first added track: Test Home page Player
-
-
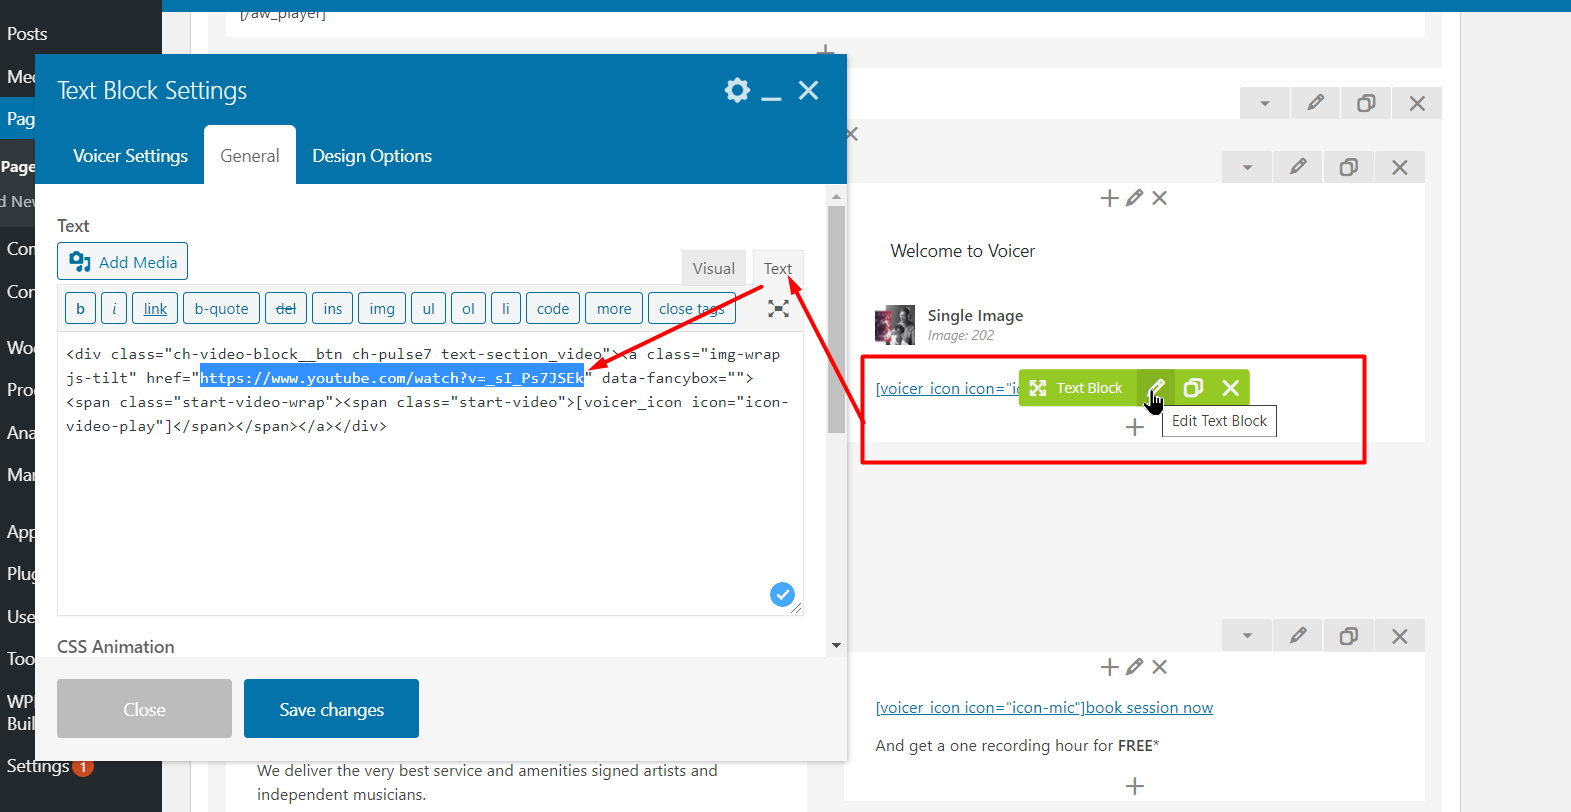
Example 02: Change the YouTube video link in the Welcome block on the Homepage
To change the existing video to yours you should open the Text block, press in it the Text button and change the existing YouTube video link.
Sources and Credits
We have used the following files as listed.
- jQuery - JavaScript Library
- Bootstrap - Bootstrap by Twitter
- AwpPlayer - Is a customizable audio waveform visualization
- tilt.jquery.js - A tiny requestAnimationFrame powered 60+fps lightweight parallax hover tilt effect for jQuery.
- Slick - jQuery carousel plugin
- Isotope - jQuery plugin filter & sort plugin
- FancyBox - Is a tool that offers a nice and elegant way to add zooming functionality for images, html content and multi-media on your webpages
- tilt.jquery.js - A tiny requestAnimationFrame powered 60+fps lightweight parallax hover tilt effect for jQuery.
- TweenMax.min - TweenMax is the most feature-packed (and popular) animation tool in the GSAP arsenal.
- CSS Animation Library
- jQuery Scroll Ease
Custom JS file is located at theme's js folder. All external JS plugins are located at js/vendor/ folder.
Once again, thank you for purchasing this Theme. As mentioned at the beginning of this documentation, we would be glad to help you if you have any questions related to this Theme. For more general question related to this Theme on ThemeForest, you might consider visiting the forums and asking your question in the "Item Discussion" section.
If you are satisfied with Voicer WordPress Template please go to your downloads section on ThemeForest.net and rate Voicer WordPress Theme with 5 stars.
Otherwise, SEND A EMAIL and I will try to find nice and easy solution for you :)
Hope that you will enjoy in Voicer WordPress Template as much as I've enjoyed designing this template.
Kind Regards,
softali
If you have any questions, please do not hesitate to use our SUPPORT FORUM - We are happy to help!